How to glue a pvc boat
Many anglers are interested in how to seal a PVC boat at home, because taking it to the service is a bit expensive, and there seems to be nothing complicated in the repair process. It really is.
Before you start sealing the damage, you need to pay attention to the fact that glue like “Seconds” or “Moment” is not at all suitable for this purpose. These compounds are not designed for such work and will not provide the strength that is needed - the patch will quickly peel off. But the problem is that it is rather problematic to remove such glue from the surface of the boat, so you will most likely have to put a new patch on the surface that is smeared with Moment. And this does not add reliability and quality.
Therefore, to repair damage on the boat, you should use the glue that comes in the repair kit or similar adhesives. It should only be taken into account that the "Uranus" included in the set becomes soft in warm weather and the patch can peel off.
There is nothing complicated in the process of sealing a boat at home. You just need to follow some generally accepted guidelines. And so, we decided that we would not write much, so here is a detailed step-by-step instruction on how to seal PVC boats at home.
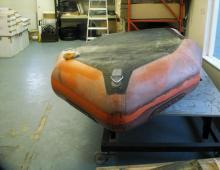
1. Before proceeding with the repair, the boat must be dried, cleaned of dirt around the cut / puncture and laid out on a flat surface. Some advise to clean the place of gluing with sandpaper, but you should not do this - this will damage the coating and material of the boat and reduce its wear resistance.
2. Degrease the cleaned surface around the damage. It is best to use a solvent for this purpose. If it is not at hand, then acetone or alcohol will do.
3. Cut out a patch a few centimeters larger than the hole. It is better to use the material for the patch from the repair kit, or find a similar one. If there is any doubt, then it is better to degrease the patch.

4. If this is a cut on the bottom of the boat, then it should be carefully sewn up with harsh threads.

5. Apply the patch to the damage in the way it is planned to be fixed and trace with a pencil to outline its boundaries on the boat.

6. Now we take the glue, best of all on a flat small brush and coat the patch and the boat with it, inside the circled contour.
7. We are waiting for about 15 minutes for the glue to begin to harden and apply a new portion of the adhesive on both surfaces.
8. After about five minutes, the places where the glue was applied must be heated with a hair dryer. You should be careful to warm it up and not dry it out.

9. Now we glue the patch for damage, making sure that the surfaces with the glue applied coincide and gently iron with some hard object to press well and get rid of air bubbles that could get between the glued surfaces.
10. In the event that the cut is larger than five centimeters, two patches should be applied. One inside, the second outside according to the above method. And for greater strength and tightness, you can put two patches on top - the first is a couple of centimeters larger than the damage, the second is several centimeters larger than the first patch.
11. Carefully, so as not to bend the place of gluing, we send the boat to dry for a day, and preferably two.
There are times when the damage is only a scratch on the top layer of the boat, without any significant damage. You can simply fill it with glue from the repair kit, this will be enough. But you can, for greater reliability, put a small patch. This is of course if you are very worried about your favorite boat.
There are situations when the damage is significant and it is rather difficult to connect exactly the edges of the gap (cut) of the material before gluing. Therefore it is recommended:
- the damaged area is washed and dried;
- laid out on a flat surface and degreased;
- before starting gluing the damaged edges, it is better to sew them together, and only then proceed to the main gluing stage.
With this elimination of extensive cuts and gaps, it is desirable to install two patches at once. This is a more complex repair, but one can do it alone. One of the patches is glued on the inside, and the other on the outside of the damage. To make it easier to stick the patch inside the boat, you can use a special hook.
Having completely unscrewed the valve, glue the first patch through the hole using a hook. It is always glued inside the boat, and then only the outer patch is glued. After the repair is completed, it is necessary to make sure that inside the walls of the cylinder they are not glued together due to the ingress of glue on them. If, nevertheless, such a nuisance occurred, then gently immediately pull the balloon by opposite sides.
To eliminate the gnaw through of the boat on top of the outer patch, it is better to additionally glue a larger patch. It turns out that two patches will be glued on the outside at the site of damage. But there is no need to rush to glue the second one. Only after the glue has dried well on the previous patches, you can glue the third one.

Damage to the bottom is quite specific. Their main culprits are snags in water bodies, large tree branches, and bars from reinforcement. Such cuts are ragged and have a complex configuration. When repairing them, you should also put an internal and external patch. And for precise connection of damaged edges, threads can be used for stitching. The very procedure for carrying out the work is the same as for the repair of ordinary punctures.

After drying and degreasing the seam of the boat and the place around it on both sides, a patch is cut out with a size slightly larger than the length of the damaged seam. A thin layer of glue is applied to the patch. Then it is glued and immediately rolled with a roller. Excess glue that has come out can be removed with a cloth moistened with solvent. After the glue dries on the first patch, another one is cut out. Its dimensions are larger than the first, taking into account that it is possible to make a bend on the reverse side. After gluing it, you also need to roll the damaged area.

When the repair of the seam is completed, in order to check the quality of work, the boat must be inflated. Using a soapy solution, treat the repair site with it and check the air outlet. If everything is fine and the soap solution does not poison, then after 24 hours the boat can be used for fishing.
Most cases of valve failure are due to mechanical action. Your boat is deflated after fishing. Friends help you collect payolas. And by chance someone steps on the valve, under which there is a stone on the other side. Crack, in such a situation, probably, hardly anyone will hear ...
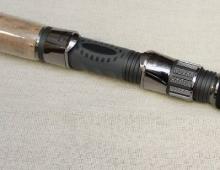
In order to replace the valve, you will need a special key. I do not advise you to “pick out” the valve with improvised means, otherwise you can damage it and then, in order to remove it, you will need three times as much effort and time.
If you don’t have a “proprietary” key, then you can make it yourself. To do this, you will need a metal or hard plastic tube with a diameter of 13 to 20 mm and a jigsaw, which will need to saw out “teeth” to contact the inner surface of the valve. From above, you can make a small cylindrical hole, where the "knob" is subsequently placed.
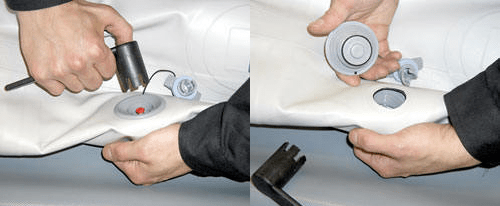
So, everything is ready! Boat cylinders must be deflated. Through the material, feel and firmly squeeze the mating part of the valve, the so-called "glass", in your hand. Use a wrench to unscrew the valve body from the "glass". There are cases when, as a result of long-term operation, the valve “sours” and does not get out of the “glass”. In this case, you can use the car spray "liquid key".
Before inserting a new valve, it is useful to inspect the faulty one. Sometimes it is enough just to blow it out and wash it in soapy water, and lubricate the “sticky” valve spring with a small amount of grease.
If your old valve does not lend itself to resuscitation, then change it to a new one.
While holding the mating part of the valve ("glass") with your hand, tighten the new valve with a wrench. Do not overdo it!
The new valve must be screwed on tight enough, but not “tightly”!
Firstly, it may ever have to be unscrewed, and secondly, excessive tightening force can easily lead to breakage of the valve or key.
Inflate the balloon and use a soapy solution to check the tightness of the connection. If air is leaking from under the valve, then “squeeze” it with a key.