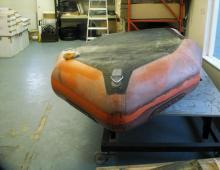
How to glue a pvc boat with your own hands
Boats made of PVC are the most commonly used fishing boats today. There are many reasons for such popularity. There is a wide range of them on the market: you can choose a boat of any size and configuration. PVC boats produced are of good quality and durability. They are compact and lightweight: when deflated, they easily fit into a backpack and are not difficult to carry.
And most importantly, if the boat is damaged in the water, it will not be blown away quickly. This feature lies in its design: the boat is divided into a large number of chambers, so if it is damaged, the air in other chambers will not allow it to sink and will keep it afloat for some time. And this allows you to safely get to the shore, inspect it and, if possible, repair it.
Causes of damage to the boat and their types
There can be many reasons for the depressurization of the boat:
- punctures;
- scratches;
- cuts;
- burns;
- tears or ragged holes.
The most common cause is punctures. They appear when you carelessly use a hook from a spinner, from a knife. A puncture can be obtained in the course of pulling the boat ashore, damaging it with sharp objects on the shore.
Scratches are not considered to be such a serious type of damage, but they are fraught with danger. At the most unexpected moment during further use, they can lead to a rupture of the material.
Cuts appear on contact with any cutting tools, for example, during improper storage or transportation.
Boat breaks are not excluded in a collision with objects sticking out of the water. If stored improperly, torn holes may appear from biting by small rodents. They are attracted by the remaining smell from the fish or leftover food.
Boat burn-through can be obtained very easily, as PVC is a heat-sensitive material.
If a depressurization of the boat is detected, it should be thoroughly inspected:
- Check valve condition. It must be closed and its lid open. To prevent air from passing through the valve, it is necessary to pour water into it and observe the appearance of bubbles. If they are not there, then the problem of depressurization must be sought elsewhere. And if bubbles appear, then you should check the valve for debris that prevents it from closing tightly. To do this, you can purge the valve with sharp strokes of the pump. When the valve passes air from the side, then it is most likely relaxed and must be tightened with a key. If this does not resolve the problem, the valve should be replaced.
- Apply foamed water with a sponge or brush to the area around the valve. If bubbles appear here, it is necessary to lift the valve.
- Check the bottom of the boat for leaks. To do this, water is poured into the boat.
- Examine the balloon inside. Foam water is used for this inspection. It is applied to the inner surface of the cylinders and inspected for the appearance of bubbles.
- You can find the place of damage by ear. It is enough to pump up the boat more than the prescribed norm and listen to the hiss in silence. By this sound, you can accurately determine the damaged area.
Repair materials
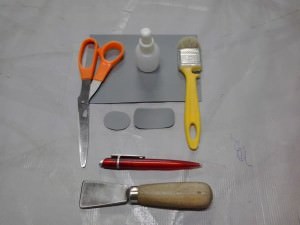
After finding the cause of the depressurization of the boat, you can begin to eliminate them. To quickly and effectively eliminate the detected damage, you will need:
- Repair kit that is included with the boat upon purchase.
- Scissors or knife.
- Roller or plate made of metal (plastic).
- Pencil.
- Tassel.
- Solvent or acetone.
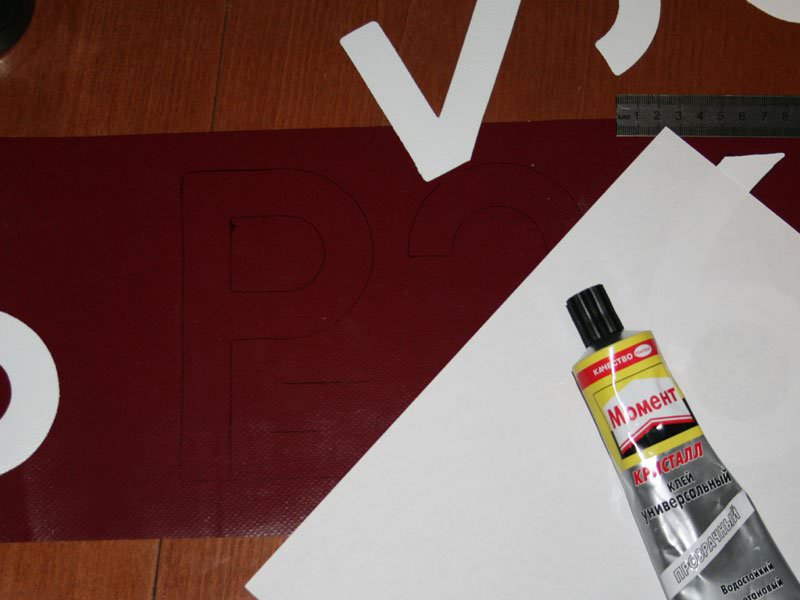
- Glue.
Often, many anglers have to deal with a situation where the glue from the kit thickens or dries. Therefore, you have to buy it yourself. Particular attention should be paid to the choice of adhesive. It has certain requirements:
- have heat resistance (this is important when troubleshooting in the summer, when the repaired surface is very hot);
- have the right level of elasticity;
From the experience of anglers, we can conclude that the adhesive included in the repair kit is suitable only for emergency repair of damage, that is, for repairs in field conditions. If this glue was used, then upon returning from fishing, it is better to redo the repair of the damaged boat.
When choosing glue, you should pay attention to:
- on its composition. If resins are included in the composition, then it is better to refuse to buy, as they increase stickiness, and the quality of bonding decreases.
- On the tube of glue, information is indicated that the glue is heat-resistant. Under the influence of solar heat, the PVC material heats up, and the patch will peel off under the influence of heat.
- The indication on the tube "special" is preferable to "universal". Special glue, taking into account the characteristics of the material, holds the glued surfaces better.
- Information on the tube "polyurethane". Such an adhesive will provide high-quality and durable work to repair any damage.
Do not use glue from the “Moment” and “Superglue” series for repairs, due to the fact that during operation the adhesive layer cracks and air begins to freely escape through the cracks. And this will lead to the fact that very soon it will be necessary to do repeated repairs. A good result of the repair is given by adhesives of the brands "RK-2", "Master glue", "UR-mono", "Vinikol-1520", "900I", "PENOSIL Fix Go" - polyurethane adhesive, as well as durable and reusable adhesive "KERNIL ".
To ensure high-quality gluing of the patch and the damaged area, it is recommended to add additives "Polyisocyanate (grade B)" or "Desmodur" to the glue.
The mixing of the adhesive and the selected additive is carried out in the proportion of 95-98% of the adhesive and only 5-2% of the additive by volume.
How to seal a boat with your own hands
Any type of repair begins with preparation:
- the damaged boat is blown away;
- the site of damage should be washed and dried well;
- further, laying out the damaged area on level ground (you can put a board under it for ease of repair), degrease it using a solvent or acetone.
And if these funds were not at hand, they can be replaced with gasoline, kerosene and ordinary alcohol.
When the damaged surface is well prepared, you can proceed to the main stage of repairing the damage.
- From a piece of PVC material, which is included in the repair kit, a patch is cut out of the desired shape. Its size should exceed the place of damage by 4-5 cm. If there is no patch from the repair kit, a piece of thin rubber or thick oilcloth will replace it well.
- The prepared patch should also be degreased.
- Glue is applied to the repaired area and the patch, after 3-4 minutes press them tightly to each other.
- Apply a patch to the place of damage and roll it with something heavy. This procedure is necessary to remove all air from under the patch.
- Next, you should pump up the boat, but only until it acquires its shape and leave it in this state for 2-3 hours. If it is not possible to pump up the boat, then without bending the material at the site of damage, it should be carefully folded and left to dry.
When repairing a boat, several gluing methods can be used.
- Glue is applied to the damaged area and the prepared patch with a brush. After 3-4 minutes, the surfaces to be glued are pressed against each other. The described method is bad in that it is suitable only for repairs in field conditions and is short-lived. If possible, it is recommended to replace the supplied patch with a new one.
- A layer of glue is applied to the surfaces to be glued. After the first application of the adhesive, after about 8-10 minutes, apply a second layer of it. Apply a patch to the damaged area and roll with a heavy object, squeezing out the air.
- Dry the second adhesive layer well until it completely loses stickiness, then apply a patch to the damaged area. To start the action of the glue, it should be heated to a temperature of 60-80C (a household hair dryer is used for heating). Then the patch is rolled up. You can apply this method of gluing in a different sequence. The patch and the damage site are heated with a hairdryer, and then applied to each other and rolled. This method of gluing is the most optimal and high-quality, but takes more time. Therefore, it is used in the repair of boats only at home.
For 7 years of active passion for fishing, I have found dozens of ways to improve the bite. Here are the most effective ones:
- Biting activator. This pheromone additive lures fish the most in cold and warm water. Discussion of the Hungry Fish bite activator.
- Raise gear sensitivity. Read the appropriate manuals for the particular type of tackle.
- Lures based pheromones.
Features of repair for various types of damage
There are situations when the damage is significant and it is quite difficult to connect exactly the edges of the gap (cut) of the material before gluing. Therefore it is recommended:
- the damaged area is washed and dried;
- laid out on a flat surface and degreased;
- before gluing the damaged edges, it is better to sew them together, and only then proceed to the main gluing stage.
With this elimination of extensive cuts and gaps, it is desirable to install two patches at once. This is a more complex repair, but one can do it alone. One of the patches is glued on the inside, and the other on the outside of the damage. To make it easier to stick the patch inside the boat, you can use a special hook.
Having completely unscrewed the valve, glue the first patch through the hole using a hook. It is always glued inside the boat, and then only the outer patch is glued. After the repair is completed, it is necessary to make sure that inside the walls of the cylinder they are not glued together due to the ingress of glue on them. If, nevertheless, such a nuisance has occurred, then gently immediately pull the balloon by opposite sides.
To eliminate the gnaw of the boat on top of the outer patch, it is better to additionally glue a larger patch. It turns out that two patches will be glued on the outside at the site of damage. But there is no need to rush to glue the second one. Only after the glue has dried well on the previous patches, you can glue the third one.
Features of the bottom repair. Damage to the bottom is quite specific. Their main culprits are snags in water bodies, large tree branches, and bars from reinforcement. Such cuts are ragged and have a complex configuration. When repairing them, you should also put an internal and external patch. And for precise connection of damaged edges, threads can be used for stitching. The very procedure for carrying out the work is the same as for the repair of ordinary punctures.
Features of seam repair. After drying and degreasing the seam of the boat and the place around it on both sides, a patch is cut out with a size slightly larger than the length of the damaged seam. A thin layer of glue is applied to the patch. Then it is glued and immediately rolled with a roller. Excess glue that has come out can be removed with a cloth moistened with solvent. After the glue dries on the first patch, another one is cut out. Its dimensions are larger than the first, taking into account that it is possible to make a bend on the reverse side. After gluing it, you also need to roll the damaged area.
When the repair of the seam is completed, in order to check the quality of work, the boat must be inflated. Using a soapy solution, treat the repair site with it and check the air outlet. If everything is fine and the soap solution does not poison, then after 24 hours the boat can be used for fishing.
When is it better to refuse do-it-yourself repairs
When the damage to the boat is quite extensive, and the length of the tears or cuts exceeds 20 cm, and they have a complex configuration, it is simply impossible to do a quality repair with your own hands. In such a difficult situation with a repair issue, it is better to contact a service center and be sure that after it is completed, the boat will still last a long time.
In addition, it is better to trust experienced specialists and if there is no experience and confidence in performing high-quality boat damage repairs.
- Do not use sandpaper when cleaning a damaged surface.
- Glue the masking tape along the marked contour in order to prevent the glue from getting on the rest of the boat.
- If the glue dries out a little during storage, it should be diluted with acetone.
- Before gluing the patch to the damaged area with complex edges, you can first sew these edges with threads.
- When heating, do not use an open source of fire, as the material can easily deteriorate or ignite.