Automatic podsekatel for the bottom fishing rod. Simple hook for bottom gear
rods
The self-hooking feeder, as well as for other types of fishing tackle, refers to auxiliary devices, whose usefulness and effectiveness are determined by the time and circumstances of fishing. Such devices appeared not very long ago.
At first it was a variety homemade devices, which savvy fishermen invented and made for their fishing rods and snacks. Now many devices that contribute to the automatic hooking of fish are produced by industrial enterprises.
Purpose of automatic undercutters
As you know, the most active and interesting part of fishing begins at the moment when the fish bite. Some types of fish are cautious, others not so much, they begin to taste the bait. It is at this moment that you need to make effective hooking. Such hooking is quite possible if you fish with one rod, and even better - if you constantly hold it in your hands.
If you are fishing with multiple gear, which is often the case in feeder fishing, you simply may not have enough time to react to a bite, run to the right rod and set the hook.
Self-hooking hooks for fishing, just in such cases, will be very useful. Their main purpose is timely and with the necessary effort to hook the fish, even without the participation of the angler in this process. These devices, during the bite, provide the necessary jerk of the snap in automatic mode. Quite often, experienced anglers, based on a self-developed design, make a spinning hook with their own hands.
Types of automatic undercutters
Absolutely any fishing rods and bottom gear can be equipped with such devices designed for hooking fish without the participation of an angler. Most often these mechanisms, depending on its structure, equipped with ordinary snacks, feeder gear and even float fishing rods.
A self-hook designed for spinning also exists, although many anglers doubt its necessity, because spinning fishing assumes that the blank is in the hands of the angler all the time. It is rational to use the spinning hook only when trolling or if the spinning is adapted for feeder gear.
An automatic fishing rod with an autohook is useful when long fishing when the angler cannot always be near her, as well as in the case when fishing is carried out on several (sometimes 4-5) rods.
Depending on their design and manufacturer, these devices are divided into the following types:
- Improved gear. This type includes floats and hooks, which, due to certain changes in their design, allow hooking fish without the participation of a fisherman.
- Various custom designs. As a rule, a do-it-yourself fish hooker and its operation scheme is based on the same principle of operation as an ordinary mousetrap. The main driving force in them is either dense rubber or a stretched spring of the required power.
- Industrial devices. This type includes technological mechanisms that were originally designed for a particular tackle.
Anglers often improve industrial designs of self-hooking hooks to suit their requirements, increasing or, conversely, somewhat weakening their sensitivity and strength of action.
Features of various types of hooks
The most important characteristic in the action of any automatic hooker is undoubtedly the force with which it affects the prey. In accordance with the required impact force, the tension power of the springs or rubber used in the device is calculated. It is, as a rule, the more significant, the heavier the tackle for which the mechanism is intended. For example, a feeder hook requires more actuation force than a donkey hook with a short or no stick.
It is also important to take into account the power required for removing the device from the safety stop and initiating the cutting itself. Stoppers and triggers, depending on the tackle, also come in different designs and power, but, what is necessary, they all must be sensitive enough, this will ensure that the device responds to any, the most careful bite.
It should be borne in mind that an industrially made fishing hook is calculated for a certain gear, with specific requirements, only if it comes with this gear. The rest of the industrial mechanisms, which have different principles of operation and power, must be selected for your tackle on your own and, if necessary, modified.

A do-it-yourself hook always takes into account the characteristics of that rod, the tackle for which it was conceived and made. For example, a do-it-yourself spinning hook should take into account the following factors:
- Spinning weight and length.
- Approximate casting distance. This is important for an approximate calculation of the weight of the equipment in the water.
- When trolling - the strength of the current and the speed of the boat.
- The size of the expected trophies, their type, as well as how the bite of this type of fish usually occurs (carefully or quickly).
If the angler, who independently manufactures an automatic hook for his tackle, manages to take into account all these factors and make a suitable device, the number of unnoticed or empty bites will be significantly reduced.
In the manufacture of hooks designed for bottom gear, anglers often use a variety of runners in combination with rubber bands or converted mousetraps. Also common are vertical posts that are fixed in the ground or at the side of the boat, with powerful springs and appropriate stoppers.
Apart, among all the devices for automatic hooking of fish, are floats and hooks.
A float that promotes self-cutting of fish is, as a rule, an ordinary float with an elongated central rod, supplemented by a disk of non-sinking material with a hole in the center for the passage of the upper part of the float rod and a special stopper (thickening) in the upper part of this rod. When biting, the main part of the body of the float goes under water, but at the end, the stopper interacts with the disk, which sharply slows down its going under water and contributes to the self-hooking of the fish.
Self-locking hooks have a modified shape, somewhat similar to a spring, which contributes to its deep penetration into the throat of the fish and its notching. Such hooks are produced by only a few foreign enterprises and are rarely found on sale. Their main drawback is that it is very difficult to release the caught fish from such a hook.
An example of a homemade self-cutting feeder
Let's take a look at one of the options for an automatic hook for a feeder, in which the rod is attached to the swinging element of the rack, like a rocker arm, and hooking occurs due to spring compression. Such a mechanism is quite possible to do it yourself. Its design and principle of operation is easy to understand by understanding the following diagram:

The numbers on the diagram indicate:
- Rod (spinning).
- The front bracket of the rocker on which the fishing rod is attached.
- Rocker body.
- Fixing the axis of the rocker arm to the stand around which it rotates.
- Rear rocker bracket. The upper part of the spring is attached to it.
- Spring.
- The main stand of the undercut. It must be made of stainless steel corner.
- Holes on the main rack. They are needed to strengthen or weaken the tensile force of the spring.
- Cushioning rubber. It is necessary to soften the action of the spring.
- Attaching rubber to the body of the bracket.
- Bracket axis.
- Trigger. It is made of steel and must have a certain bend in the upper part so that it can slip off the axis of the bracket when cutting (it must be selected empirically).
- Fastening the axis of the bracket to the body of the rocker arm.
- Main line with rigging.
- Coil.
The adjustment of the mechanism is carried out after fixing the main rack in the ground. The sensitivity of the trigger depends on the top curve of the trigger.
Useful video
In the video below, we will see an example of a self-tapping feeder in action:
Any self-hooking devices, industrial or self-made, are designed to help the angler when fishing and not allow prey to leave when biting. But still, they should be used only under certain circumstances, when they cannot be dispensed with. After all, the joy of catching a trophy that was cut on your own is incomparably higher. Yes, and the fishing in which such devices are used cannot be called sports, rather, semi-automatic.
klevyj.com
Currently, there are many designs of self-cutters, which are designed for the timely hooking of biting fish. I would like to note the fact that it is advisable to use these mechanisms only in case of poor biting or when catching large fish, when bites do not occur as often as we would like. As a result, we have free time to experiment with other gear and fishing methods. Having considered some of the designs of such mechanisms, the authors of this article came to the conclusion that many of the proposed solutions are narrow in scope.
In our opinion, some designs of self-hooking hooks are excessively rigid and can work only when biting large fish, while others, on the contrary, are intended only for hooking molva of an unworthy size. Some well-known versions of such devices are overly bulky and difficult to manufacture, while others, even outwardly, do not inspire any confidence and may well work when hitting water when casting gear. Below is a detailed description of the self-hooking device that successfully works with gear designed for bottom fishing (donk, feeder, picker, etc.). In addition, this mechanism can be used for winter fishing from under the ice, after a little refinement. Let us remind the home-made masters that all the designs we cite, although they are quite workable in themselves, should not be taken as an unshakable truth.
Remember - THERE ARE ALWAYS OPTIONS!!!
In our opinion, the self-hooking device described below is very versatile and can be used for catching fish of a wide range of sizes and “weight categories”. Using materials with other parameters of elasticity and rigidity in the manufacture of this mechanism, you can end up with a product that works on very small fish or make a “monster” that can easily pierce through the mouth of a huge catfish with a hook.
The dimensions and design parameters given below work correctly for fish from 100 gr. up to 5 kg. We consider the disadvantage of this design to be the inconvenience associated with the need to manually remove the fishing line from under the guide bracket after the self-trigger has been triggered. However, the very high sensitivity of this mechanism to fish bites will not allow even the most cautious underwater inhabitant to escape with impunity.
m while it is absolutely not necessary to sit next to the tackle, peering intently at the behavior of the nod, and the tackle itself (feeder, picker) may be, in this case, more budgetary. In our opinion, a more successful self-hooking device can only be a design that provides for its installation directly on the rod blank, if you use one. But more on that later. And now we will consider a detailed description of the manufacture of a stationary structure of a self-cutting device with our own hands from improvised material.
From any suitable material (chipboard, plywood, board, etc.) we cut out the base of the self-cutting 250-100 mm. (photo 1). For the manufacture of the self-hooking lever and the gate stopper, we need a steel bar with a diameter of 3-4 mm. In this case, we use the door lock rod from Oka, purchased at a car dealership. And for the manufacture of the lever spring, we use steel wire extracted from the cable. This wire has good rigidity and elasticity (see photo 2).

Photo 1 Photo 2
With the effort of the hands, keeping the parts from turning with pliers, we wrap the spring wire around a 3 mm rod, stepping back from the edge of 5-7 cm. It is necessary to make ten turns, trying to lay the wire tightly coil to coil. The direction of the curl does not matter. If you curl clockwise, then you get a lever with a left location relative to the axis of the mechanism, and if counterclockwise, then with the right (photo 3). Then we bend 3 mm. the rod at an angle of 90 degrees, stepping back 6 centimeters from its edge (photo 4).

Photo 3 Photo 4
After curling the spring, its opposite ends should look in different directions (120-180 degrees). It must be borne in mind that a spring twisted at a large angle, due to the inertia of the lever, can break the lip even of a large fish. Before continuing to work with the spring, it is necessary to make a bracket for attaching the lever to the base of the self-hooking device. In this case, we bent a piece of thin sheet metal 80x40 mm. in half, getting a strip of 80x20 (for rigidity). Then two ears about two centimeters high were formed by bending the ends of the strip at an angle of 90 degrees. In the next step, we drilled two holes with a diameter of 3.2 mm coaxially to each other in opposite ears of the bracket, obtaining the axis of rotation of the lever.
For the convenience of further installation, we shifted the holes slightly forward relative to the axis of the bracket itself. Then, two more holes were drilled in its base for fastening to the self-hooking, shifting them slightly back relative to the axis. To avoid injury, round the sharp edges of the ears with scissors and the bracket is ready (see photo 5). A more successful option for attaching the lever to the base would be a cantilever mount (see photo 6). In this option, always during fishing, it will be possible to remove the lever from the bracket and winding the spring in one direction or another to achieve the necessary hooking power, based on the size of the intended fish.

Photo 5 Photo 6
Now, at a distance of 7-8 cm from the bend of the lever, we wrap its rod with a spring two or three times (see photo 7). At the next stage of working with the lever, we need to form a fishing line catcher at its other end, which will not allow it to go to the side and be left without control during the operation of the self-trigger. To do this, at a distance of 15-16 cm from the axis of the lever, we make a bend at an angle of 180 degrees. Then we will sequentially make four two-centimeter bends, forming a semblance of a slingshot with a forest receiver groove directed downwards. Photos 7 and 8 show the final result of these actions from different angles.

Photo 7 Photo 8
Now you can fasten the bracket with the lever to the base of the self-hooking device in such a way that the groove of the forest receiver is located along the axis of symmetry of the mechanism, and the end of the lever is located two centimeters from its outer edge (see photo 9).

Now let's start making a gatehouse-latch, which will directly respond to fish bites and hold the self-hooking lever in the cocked position. Photo 10 shows the shape and dimensions that must be followed.

Then we need to mark the place of fastening of the gatehouse-latch on the base of the self-cutting device. To do this, press the gatehouse-lock with the lever of the self-hooking device in the working (cocked) position and mark with a pencil on the base the axis of attachment of the gatehouse (see photo 11). The retainer guard is a lightly loaded element, so you don’t have to try hard with its fastening. It is enough to fix it at two or three points with staples made of 40 mm galvanized nails with bitten heads (photo 12).

photo 11 photo 12
Next, we cut a regular rubber eraser in half (any other rubber will do), cut grooves in it and install it with an interference fit in the fork of the gatehouse-latch (see photo 13). Then we will make a longitudinal cut in the rubber (8-10 mm.) To clamp the main line of the tackle in it (photo 14).

Photo 13 Photo 14
For a more reliable fixation of the gum in the gatehouse fork, you can wrap it with several layers of electrical tape. Now we will mark the location of the guide bracket, which should be on the same axis as the groove of the lever receiver (see photo 15). The remaining half of the elastic band can be used as a cushioning buffer by screwing it with a self-tapping screw under the self-tipping lever (see photo 16).

Photo 15 Photo 16
Photo 17 shows how to tuck the fishing line into the working position. Now it remains for us to drill one or two holes in the base of the samopodsekatel, so that we have the opportunity to fix the samopodsekatel on the shore of the reservoir. Through the holes, you can drive pegs into the shore, which will securely lock our product and prevent it from “escaping” into the water when a large fish jerks. In addition, you can tie it through these holes to any fixed object on the shore (for example, to a bracket on the plates if you are fishing on a dam). Everything - the self-hooking device is ready for work (photo 18).

Photo 17 Photo 18
Now a few practical tips on the use of this design of the self-cutting device. This samopodsekatel is recommended to be used in conjunction with bottom rigs equipped with a sliding weight of 40 grams or more. The weight of the sinker used depends on the size of the intended production and, accordingly, on the angle of twisting of the lever spring. The weight of the load should be such that the fish could not pull it off the spot when pulling the bait. A paternoster with an asymmetric loop proved to be very good when working with this device (see homemade, asymmetric loop). In the case of using such a tandem, the hooking of the fish will occur, regardless of the further direction of the movement of the fish, after it has taken the bait. Moreover, at the same time, the fish practically almost does not feel any resistance from the gear and the self-hooking device itself. It is enough for the fish to apply a force of several grams to the guard-fixer, as a lightning-fast sharp hooking will occur.
Figure 1 shows a diagram of the operation of a self-cutting device.

First, we cast our tackle in the usual way and take the slack off the line. We lay the rod on the stands intended for this, located at some distance from the water's edge. Remember - the drag of the reel must be set up as in normal fishing. Then we cock the samopodsekatel lever to the working position and fix it with a watchdog stopper.
Holding the gate stopper with one hand to prevent spontaneous operation, with our free hand we wind the fishing line under the guide bracket, and then into the slot of the gate stopper rubber. Then we pull the line in the area between the guide bracket and the rod tulip towards the rod until the line is stretched in the area between the load and the gatekeeper. After that, holding the elastic of the gatehouse with one hand (keeping it from moving forward), with the other hand, for the fishing line, we pull 2-10 centimeters towards the bait, loosening the tension of the equipment. It should be borne in mind that this is the distance the fish will travel after taking the bait and this is the distance the hook will travel during hooking in the direction opposite to the movement of the fish. If we do not weaken the fishing line, then when biting, our prey will immediately feel the weight of the load and throw the bait.
And even if the self-hook works, it will “fight” with the weight of the load, and not with the thickness of the fish’s lip. Thus, in order for the hook hook to work correctly on medium-sized fish, we loosen the tackle by 2-5 cm when catching medium-sized individuals and by 5-10 cm when catching trophy specimens.
And at the end of all the manipulations, we move the lock-guard to the very edge of the self-hooking lever so that it barely keeps the lever from resetting, and we wind the excess line onto the rod reel, leaving a small slack that is necessary for the free movement of the lock-guard (3- 5 mm.). We tried to describe in detail all these manipulations, and this description took up quite a few lines. However, if you understand everything correctly, you will be able to competently “charge” the self-hooking hook while fishing in 20-30 seconds.
This device can also be used for winter fishing from under the ice. If you install a wire reel directly on the base of the self-hook, then we will have a fully equipped tackle with a self-hook. To catch fish from the hole, you need to bend the gatekeeper a little forward (see Fig. 2), while you must not “overdo it” with the bending angle, because. samopodsekatel can start to work even from the weight of the eraser, fixed in the gate stopper.

When fishing in the summer with a feeder or picker, at a certain moment of self-cutting, part of the energy is taken over by the tip of the rod, absorbing the shock load. Due to this, the probability of a breakage of the gear due to the forces that arise during the operation of the self-cutting device disappears. With the winter version of using this device and incorrectly adjusting the angle of twisting of the spring, there is a high probability of breaking the fishing line, in addition, the hooking is excessively sweeping.
Therefore, it is recommended to equip the winter fishing samopodsekatel with a simple lever stroke limiter. If someone is interested in this device, he can contact the Site Administrator, and We will be happy to tell you: "How it works!". For the convenience of working with this self-hooking device, you can attach another rubber band to the lever of the device, as shown in photo 19. In this version of the self-hooking device, the guide bracket will no longer be needed, and after the device is triggered, the fishing line will easily free itself from both rubber bands (on the stopper gate and on the lever). In extreme cases, it will be easy to release the line by pulling the rod taken in hand away from the self-hooking rod. In most cases, the line will release itself when the fish caught on the tackle is jerked.
http://all-fishing.pp.ua/
fishbook.com.ua
Option 1
The self hook is designed for use with a fishing rod or spinning rod and the spring properties of the rod. During the bite, the bent rod is released by the undercutting mechanism, as a result, the automatic hooking of the fish is carried out without any actions of the fisherman.
In the image, we can consider the general scheme of the principle of operation of such a system.
To connect the parts of the self-hooking structure, wire bushings are used, which are soldered, or bolts - you can choose one of these solutions.
Different options are suitable as a material - steel with or without galvanization, brass is better. In general, what will be at hand.
All homemade elements must be connected and at the same time monitored - moving parts should move easily, not get stuck anywhere. You can put a little engine oil on them.
Now we have one part of a homemade auto hook. You can make a holder for installing a fishing rod or spinning rod with your own hands or buy a ready-made glass. Or take some other object of a suitable shape to fix the rod on it. For example, you can use the following diagram.
The auto hook is ready. You can put the homemade hooking mechanism in working position and wait for the fish to be on the hook.
Option 2
I met somehow an American-made samopodsekatel for fishing. It is made in a fairly simple design, as with other options, so there will be no difficulties in its manufacture.
The principle of operation of such a device and how to use it can be found from the images below.
Don't be afraid to experiment. Fishing is a hobby that can be approached creatively.
Option 3
Original float - and auto hook
Depending on what kind of fish you are going to catch, you should also choose one or another gear for a fishing rod - fishing line, hooks, float. Some fish species are very voracious. The peculiarity of catching such a fish is that you can not blink an eye - and the fish has already caught the hook, having deeply swallowed it with bait. In this case, pulling out the hook is quite difficult. To take it out and free the fish, you will have to take tweezers or some other object.
To avoid such inconvenient situations, you can make a kind of self-cutting in the form of an improved conventional float.
To do this, you need to take an ordinary store float, it should have a thin and long upper rod, at the end of which there is a thickening in the form of a head. To improve this float, you need to take a small piece of foam or cork.
First, we take a cork (or polystyrene) and cut off a fragment in the form of a circle, its thickness should be 5–10 mm. After that, you need to take a drill and make a hole in the center of the circle. Its diameter should be such that the circle put on this rod can move freely up and down, while the head of the rod will serve as a limiter for its movement. When the hole is ready, you need to take a blade or a sharp knife, and make a slit from the hole to the edge of the circle.
This is necessary so that the circle is aimed at the float, or remove it if necessary. It is better not to cover the circle with paint, because due to extraneous odors, fish in the water can simply bypass the bait.
The work of such an improvement is built according to the following principle. Some fish - for example, perch or rotan - have such a feature - they grab the bait very sharply. In the case of a sharp bite, the float goes under the water, and the circle stops on the water with the head of the float - and thus cuts the fish. In such a simple way, with a modified float, the catch increases significantly. As practice shows, such a do-it-yourself self-hook works even if you are not near the fishing rod.
www.umeltsi.ru

Auto hooking is often used when fishing - it increases the catch, allows you to fish with a large number of gear, allows you to do something else in parallel with fishing, and also realizes the ability to catch fish without being present at the time of the bite. Of course, you will not achieve a 100% catch when biting using auto-setting, but even without it, the bite does not always end with fish in the cage. But with a good bite, the chances of hooking a fish when using automatic hooking are often greater than when hooking manually, when you can simply miss the optimal hooking time. That's what fishing is all about. There are various schemes of auto hooks, all of them are easy to manufacture, so making them yourself is not difficult, but you can also look in stores - for the lazy. Further material for those who want to make auto-cutting for a fishing rod or spinning.
Option 1
Auto hook that can be used with any rod or spinning rod, using the spring properties of the rod itself. Undercut, or rather a mechanism that, when biting, releases a bent rod, and thus allows you to automatically hook the fish without your intervention.
The general scheme of the principle of operation of this option is shown in the figure.

The details of the auto-setting design are connected with wire bushings and soldered or bolted - as you like

Any material can be used - steel, galvanized steel, and preferably brass. In general, what is there.

Connect all the parts of a homemade auto hook, pay attention to the fact that the moving parts move easily, do not get stuck anywhere, you can lubricate with machine oil (just a little bit).

Actually one part of the auto hook is ready. A glass where a fishing rod or spinning rod is installed can also be made independently or you can buy a ready-made holder. Perhaps you already have something similar to secure the rod - any option will do. For example, you can do the following.

All is ready. Bring the do-it-yourself hooking mechanism to the “combat position” and wait for the fish on the hook.

Option 2
Caught my eye avtopsekatel American production. The design, like the rest, is quite simple, so you can also make it yourself.


The principle of operation and method of application for catching fish is clear from the above pictures.

Do not be afraid to experiment - fishing is not only a hobby, but also creativity.
Option 3
Original float with auto hook
Depending on what kind of fish you are catching, gear for the fishing rod is selected accordingly - fishing line, hooks, float. Sometimes the fish is quite gluttonous, greedy. Its peculiarity is that you may not even notice that the fish is already on the hook: it pulls once, and the float stands as if rooted to the spot. You start to choose a fishing line from the water, and the fish has been sitting on the hook for a long time, so it swallowed the bait very deeply along with the hook. It is already difficult to get a hook then. You have to use tweezers, or something else, to get it out and free the fish.
In order not to experience such inconvenience, and to make a kind of auto-cutting, it is proposed to improve the usual float.
We take the usual store float. Required with a thin and long upper shaft, which ends with a thickened head. To improve it, you will need a piece of foam or cork.

First, from a cork (or a piece of foam), a circle is cut off with a thickness of five to ten millimeters. Then make a hole in the center with a drill. The hole should be of such a diameter that if you put this circle on the float rod, then it should move freely up and down, and the head on the rod should limit its movement. After the hole is made, it is necessary to make a cut with a blade or a sharp knife from the hole to the edge of the circle. This is done so that the circle can be put on the float if necessary or removed as unnecessary. It is not advisable to paint the circle, as extraneous odors in the water can scare away the fish.
This improvement works as follows. Some fish, such as perch or rotan, tend to grab the bait very sharply. With a sharp bite, the float goes under the water, and the circle stops on the surface of the water with the head of the float, thereby hooking the fish. Such a simple refinement of the float significantly increases the catch. Quite often, hooking works when you are not near the rod at all - checked. It is often useful for inexperienced, novice fishermen, as it hooks without you, especially with sharp, fast and strong bites, which are easy to miss, and then "excruciatingly sorry." Good luck.
bazila.net
Purpose and execution

Often, when bottom fishing, you have to place the rods at a decent distance from each other due to the certain terrain.
In such a situation, an automatic undercutter will serve you well. You will be able to do something in parallel with fishing. For example, if you need to reconfigure one of the gear in case of a break.
The scheme of the auto-hook is quite simple. A typical drawing can be found on the Internet. If you still decide to make an automatic undercut, pay attention to its execution.
Auto-subtractors can be roughly divided into two classes:
- The first are installed directly on the rod or nearby. Their essence lies in the tension of the main fishing line with a rubber cord. In its absence, you can use several bank (stationery) rubber bands. A small lever is made from steel wire (an ordinary paper clip is suitable). A fishing line is attached to one side of the lever, and a rubber band under tension on the other. The lever is placed in the first ring of the rod. When the line is pulled horizontally, the lever pops out of the ring. Further, the elastic band begins to contract, dragging the fishing line with it.
- In the second method, the hooking mechanism is placed on a leash. Auto hooking occurs directly in the water. The essence of the method again comes down to the spring mechanism. When biting, the fish releases one end of the lever, which is under tension. Straightening, the lever makes a sharp jerk of the main cord, thereby hooking the fish.
The autohook will help you increase your catch. It will work faster than you will be near the rod.
Unusual Options

Mention should also be made of interesting species invented by the people.
For example, a float hook:
- in this case, the upper antenna is removed from the float;
- a home-made foam rubber ring with a diameter slightly larger than the thickness of the antenna is put on it;
- then the antenna is glued into place. The ring should move freely along the antenna;
- a bead is attached on top;
- when biting, the ring prevents the float from sinking into the water, hooking the fish.
If the fish takes to the rise, this method will be useless.
Self hook for fishing helps the angler realize more bites. You can, of course, fish using only (light, sound, etc.), but the percentage of idle hooks increases significantly.
Even self-locking ones do not always work, and this leads to the loss of fish that could be in the cage. That is, timely hooking is considered an important condition for success in fishing, and therefore the hooker becomes an indispensable piece of equipment for most anglers.
Why do you need a self-hook and its advantages
The main purpose of the samopodsekatel is that when pulling the fishing line due to the bite of the fish, make a jerk with the rod, thanks to which the hook will fulfill its function and all that remains is to bring the fish into the landing net.
In this case, a bite signaling device is not enough, because it only informs the angler about the activity of the fish, but does not make an independent hook.
Many anglers have encountered the fact that during fishing, the signaling device registers single “peaks”, and as a result, the number of fish caught does not increase. Even if the fisherman was always near the rod, he still would not have time to hook the shy fish, carefully trying the nozzle.
In such cases, the self-hooking device reacts instantly and even after a light touch of the fish on the nozzle, it immediately makes an automatic hooking. The advantages of using such devices are beyond doubt, because a person is not physically able to react so quickly.
Properly tuned reel friction does not allow hooked fish to cut off the rig or drag it into snags, and the use of self-hooks has a positive effect on the size of the catch and the results of fishing. This is especially pronounced when fishing at night, when the angler is resting and does not monitor the condition of the gear.
Although in the daytime it is not always possible to be near the rods and because of this there are idle alarms of signal devices.
Even when using electronic signaling devices, it is impossible to respond to every light bite of a fish. Self-hooking rigs do not work out weak bites, and only auto-hooking rigs solve this problem.
Varieties of auto hooks
Every missed bite is a potential loss of fish, and it's no surprise that anglers come up with tools to improve their fishing performance.
Such devices include self-cutters installed on:
- rod blank, or located next to the racks on which the donk is installed;
- in front of the leash, when the process of hooking fish occurs under water.
Which version of the self-hooking device is more convenient is up to the angler to decide, the main thing is to make a choice consciously and evaluate all the advantages and disadvantages of the design, which, unfortunately, exist.
The design of the samopodsekatel installed next to the bottom or directly on the form involves stretching the fishing line due to the elasticity of the rubber cord used, or the elastic band used in aeromodelling. To fix the elastic and connect to the rod, a wire structure is used, the manufacture of which will be discussed below.
The functionality of the self-hooking device installed in front of the leash is provided by the tension of the rubber or spring, which compresses the wire lever. When pulling the fish, the end of the lever is released, held back by a stretched spring, it straightens and provokes hooking of the fish.
Lead hooks are used mainly by floaters who perform accurate and accurate casting at close range. Donochniks have to throw equipment for long distances and the design of the self-cutting device does not withstand the load, it will straighten up even in flight.
In any case, it is useful for fans of bottom fishing to know how the design of the self-hooking leash is arranged, because it can be used when fishing at a distance of 15–25 meters. In feeder fishing, such distances are quite common, so the use of a self-hooking hook will be fully justified.
Auto hooks also differ in the type of tension material used, and this can be:
- rubber;
- springs;
- hard wire.
The simpler the design of the fixture, the more durable it is, but the service life also depends on the materials used. Structural elements responsible for the tension and actuation of the undercut mechanism must be resistant to moisture, sun and wind.
Rubber in this regard is more profitable than metal springs, but when it comes into contact with sand, burrs appear on it, and then breaks, and it is especially offensive if this happens during a fishing session. Therefore, when fishing, you need to have spare elastic bands with you in order to continue fishing even if the hook breaks.
The springs provide more tension and are more reliable in operation. But even here there are drawbacks associated with the fact that the metal of the spring rusts, and it is still difficult to provide complete protection against moisture while fishing.
Hard steel wire is the cheapest and most affordable material for the manufacture of auto hooks, but it is also “afraid” of water, which means it is short-lived. In any case, home-made devices for cutting donks are not designed for long-term operation, and it is not difficult to make them yourself.
In winter, when open water fishing is not possible, there is time to make self-hooks for the next season in the right quantities.
The benefits of homemade
The under hook is a must for anyone who fishes with more than 2 rods and prefers not to sit in front of a rod pod or racks while fishing, waiting for a bite. For example, the same carp anglers have to wait for a bite for several hours, and each fish caught is very important.
Chinese manufacturers of fishing equipment offer commercially manufactured self-hooks, but they are not in great demand and are much worse in quality than homemade devices. In addition, when making a do-it-yourself undercut, the angler refines the design in accordance with his needs and makes almost unique things.
The manufacture of home-made samopodsekatel for donkeys does not require significant financial costs, because available and inexpensive materials are used. This is another important argument in favor of making a device for hooking fish with your own hands and not having problems fishing.
Even in strong wind or rain, a well-made autohook remains in working condition until the moment when the fish bite. In anticipation of a bite, the angler can do other things, because the state of his donoks is closely monitored by self-hookers.
Making a samopodsekatel
As you know, when biting, the fish takes a hook with a nozzle, and when creating resistance, the sting penetrates the lip and pinpoints the trophy. That is, the main task of the hook is to create an effort in the direction opposite to the pull of the fish.
As an example, let's take a float tackle, for which it is very easy to make a hook. When biting, the float is immersed in water under the weight of the trophy, and for notching it is enough to increase its buoyancy, or resistance.
To do this, a foam cylinder is glued at the junction of the antenna with the body of the float, and then the antenna is inserted into it. When biting, the float does not sink, as usual, but remains on the surface and due to this, the fish is detected.
From a paper clip
The most common type of donkey auto hook is made from:
- a large paper clip;
- rubber bands for money, or a piece of aircraft model rubber tied with a ring.
This device is fixed on the rod, and after hooking, nothing prevents the angler from calmly bringing the fish into the landing net. Naturally, instead of a paper clip, a piece of hard wire 15–20 cm long is also suitable. The paper clip has an anti-corrosion coating and does not rust after getting wet on a fishing trip. Therefore, in the absence of staples, when choosing a wire, you need to pay attention to the fact that it also has a coating.
Advantages of a paper clip auto-hook:
- small size (5-7 fixtures can easily fit in a medium-sized fishing box);
- quick installation on the rod, as well as dismantling after fishing;
- high sensitivity;
- sharp and clear cutting.
When playing a fish, such a hook does not interfere with the angler and is quickly brought into working position. The main element of the undercut is a wire, and the frame of the product is made from it.
The process of making a self-tapper from a paper clip:
- the paper clip is aligned along the entire length;
- one of the ends of the wire 3 cm long is bent at an angle of 120 degrees, it will cling to the rod ring;
- 1 cm below the curved segment, with the help of round-nose pliers, a ring is made into which rubber will be threaded;
- at the other end of the wire, a rectangle with a side of 2 cm is made with round-nose pliers, a fishing line will be threaded into it;
- 0.5 cm below the rectangle, the paperclip bends at an angle of 90 degrees;
- an elastic band is inserted into the self-hooking ring using the loop-in-loop method.
The samopodsekatel is ready and it remains only to install it on the rod.
For this:
- the elastic band is attached to the coil in any convenient way;
- the curved end of the wire is attached to the first donkey ring.
The tensioned elastic band keeps the self hook in position at an angle of 90 degrees in relation to the rod blank. After casting the tackle, the line is wound into a wire rectangle and the hook is ready to go.
When a fish bites, the line pulls the wire trigger, and the curved end jumps off the rod ring. Due to the elasticity of the rubber, pulling the wire frame behind it, the line is pulled sharply in the direction opposite to the direction of movement of the fish and it is detected.
The maximum sensitivity of the device is already adjusted while fishing, and for this, the end of the wire, fixed on the rod ring, is bent at the desired angle (it can be slightly less or more than 120 degrees). It is enough to imitate the bite of a fish and it will be clearly seen how quickly the curved end of the hook jumps off the rod ring, and how much effort is needed to do this.
For such a self-hook, a rather stiff wire is needed so that it keeps its initial shape even after many hooks. Finding such a wire (if there is no large paper clip) is not difficult at all in any household. The same applies to rubber bands, which are purchased at stationery stores.
In preparation for a trip to the water, anglers make 5-7 of these autohooks, even if they use fewer rods. Still, there are force majeure circumstances in fishing, and it is better to have a stock of devices for hooking fish.
Some anglers hook wire self-hookers not on the lower, but on the upper ring of the rod, but when playing the fish, they interfere with the winding of the line on the reel.
Simple auto hook

The design of the device consists of a wire frame or frame attached to the rack and after casting the tackle, a rod is installed on it. The frame is made in the form of a rectangle without one side, and the tip of the form is placed on the edge next to this "unclosed" side.
When a fish bites, the tip of the rod slides off the frame, it pulls the line behind it and the trophy is spotted. It will take no more than five minutes to make such an auto hook, but it does an excellent job of its functions.
To make this self-tapping hook, you need a rigid wire that can hold the weight of the rod tip even in strong winds. To fix the fishing line in the desired position, a porous rubber knob is put on the tip of the stand, on the one hand, it securely holds the fishing line, on the other hand, in case of a bite, it quickly releases it.
You need to transport self-locking devices in a rigid box, because if they are stored simply in a bag, the wire can bend from an accidental blow, or a heavy object placed on top.
Stationary samopodsekatel
Self-cutting donks have become widespread among fishing enthusiasts, and many of them show imagination and modify well-known designs, improving their functionality. Along with devices attached to the rod blank, stationary self-hooking hooks are also used for fishing, which have certain advantages.
First of all, this concerns high sensitivity and finer tuning of stationary devices, and this is important, especially when catching small fish.
So, the advantages of stationary devices are:
- sensitivity;
- functionality;
- fine-tuning for certain conditions of the reservoir;
- durability.
Agree that even with the most careful operation, the paperclip auto-hook is short-lived. Even despite the simplicity of the design, it is not very convenient to make new hooks mounted on the rod before each fishing trip, and even the strongest and toughest wire still loses its elasticity.
Stationary devices are more durable and are actively used by bottomers on rivers, when fishing with a large number of rods. The main and, perhaps, the only drawback of stationary auto-hooks is their large size, but compared to their advantages, this is not a critical circumstance.
Let's consider a hook that works on the principle of a mousetrap, when, when pulling, a locking device is activated that lifts the rod, due to which hooking occurs.
To make such a cutter you will need:
- a piece of board 50 cm long, 10 cm wide;
- two pieces of steel wire 50 and 30 cm long;
- clamps for attaching the wire to the board;
- screws for fastening clamps to the board;
- eraser;
- bicycle knitting needle for making brackets for fishing line;
- plastic cambric to protect the fishing line, which is put on the bracket.
Of course, you will also need tools:
- round nose pliers;
- screwdriver for screws;
- pliers;
- hammer.
In order for the product to be durable, an especially strong steel wire is chosen that maintains rigidity for a long time.
The process of making the undercut:
- on a piece of wire 50 cm long, the edges are bent with pliers so that 5 cm from each edge “look” in different directions at an angle of 90 degrees and one of the ends is bent like λ;
- an eraser is put on one of the ends of the second piece of wire (30 cm long), and the second one is bent in the form of a bracket or in the form of Ω;
- pieces of wire are fastened with clamps to the board opposite each other so that the “tongue” of one piece goes under the “bracket” of the second;
- a bracket is made from a bicycle spoke, a cambric is put on it, and it is screwed to the board right in the middle.
It turns out a design in which a piece of wire with an eraser on is used to install a fishing line and fix the "tongue" of the second segment. The fishing line is wound into the bracket and, due to the rigidity of the wire, tension occurs when the “tongue” is inserted. The bite of the fish sets the fishing line in motion, and hence the wire with the eraser. The bracket releases the “tongue” and the wire structure sharply tightens the line, spotting the fish.
The shape of the bending of the wire segments can be arbitrary, the main thing is that they clearly fulfill their functions of tightening the fishing line.
This kind of home-made, stationary undercut allows you to adjust the sensitivity of the structure. To do this, the “tongue” is brought further or closer under the bracket, and already at a minimum pressure, the device works to tighten the fishing line. Thanks to the fastening on clamps, after fishing, the autohook folds up and during transportation the structure retains its shape.
Some will say that it takes a lot of time to make a stationary hook, but the benefits it provides for fishing are worth it. In addition, any special skills are not needed for this, and almost any fishing fan can handle the job with the help of improvised tools.
The use of self-hooking hooks increases the effectiveness of fishing, and even large trophies are easily spotted with the help of such devices. With a low cost and availability of components, the self-hooking tool helps a lot when fishing, especially if fishing is carried out on bottom gear.
With what pleasure the anglers hook the fish when, sitting on the shore in good and bad weather, they implement their hobby with sports passion. Emotions, adrenaline, a rich catch! These are all ingredients for successful fishing. But what if you need to move away from the tackle for a while, have a calm lunch and relax? For such a case, this tackle is provided. A fish hooker is very necessary when there is no time to constantly monitor the rod and guard the bite.
Homemade at work
Self-hooking with aircraft rubber
In one of the simple and at the same time effective self-hooking mechanisms presented below, the mechanism is based on aviation rubber, a plastic profile, a piece of plastic from a DVD or CD disk, an aluminum rod, an M6 bolt, two nuts (you can also use a lamb, it's more convenient), pin. As you can see, for the manufacture of a do-it-yourself undercut, scarce materials are not needed, you can assemble it from the parts at hand.
When fishing with a self-hooking hook, you can use a donk without a rod and with it, by fitting a device under it. After casting the fishing rod, you need to let go of the fishing line a little and bring it into the slot of the gatehouse.
Now, even more simple in design and operation, the auto-hook and that how does a splitter work. Such a device works perfectly on the course, it is convenient to use and can be used at any time of the year.
It is not so difficult to make a hook for a bottom fishing rod with your own hands. But here a reasonable question arises, why is it needed? After all, all the pleasure of fishing lies precisely in hooking and playing fish. Here it is worth understanding the purpose of the hook for a bottom rod as an aid when fishing using several rods.
Often, when bottom fishing, you have to place the rods at a decent distance from each other due to the certain terrain.
In such a situation, an automatic undercutter will serve you well. You will be able to do something in parallel with fishing. For example, if you need to reconfigure one of the gear in case of a break.
The scheme of the auto-hook is quite simple. A typical drawing can be found on the Internet. If you still decide to make an automatic undercut, pay attention to its execution.
Auto-subtractors can be roughly divided into two classes:
- The first are installed directly on the rod or nearby. Their essence lies in the tension of the main fishing line with a rubber cord. In its absence, you can use several bank (stationery) rubber bands. A small lever is made from steel wire (an ordinary paper clip is suitable). A fishing line is attached to one side of the lever, and a rubber band under tension on the other. The lever is placed in the first ring of the rod. When the line is pulled horizontally, the lever pops out of the ring. Further, the elastic band begins to contract, dragging the fishing line with it.
- In the second method, the hooking mechanism is placed on a leash. Auto hooking occurs directly in the water. The essence of the method again comes down to the spring mechanism. When biting, the fish releases one end of the lever, which is under tension. Straightening, the lever makes a sharp jerk of the main cord, thereby hooking the fish.
The autohook will help you increase your catch. It will work faster than you will be near the rod.
Unusual Options

Mention should also be made of interesting species invented by the people.
For example, a float hook:
- in this case, the upper antenna is removed from the float;
- a home-made foam rubber ring with a diameter slightly larger than the thickness of the antenna is put on it;
- then the antenna is glued into place. The ring should move freely along the antenna;
- a bead is attached on top;
- when biting, the ring prevents the float from sinking into the water, hooking the fish.
If the fish takes to the rise, this method will be useless.
Self-hooking feeder, its use in fishing
The self-hooking feeder, as well as for other types of fishing tackle, refers to auxiliary devices, whose usefulness and effectiveness are determined by the time and circumstances of fishing. Such devices appeared not very long ago.
At first it was a variety homemade devices, which savvy fishermen invented and made for their fishing rods and snacks. Now many devices that contribute to the automatic hooking of fish are produced by industrial enterprises.
Purpose of automatic undercutters
As you know, the most active and interesting part of fishing begins at the moment when the fish bite. Some types of fish are cautious, others not so much, they begin to taste the bait. It is at this moment that you need to make effective hooking. Such hooking is quite possible if you fish with one rod, and even better - if you constantly hold it in your hands.
If you are fishing with multiple gear, which is often the case in feeder fishing, you simply may not have enough time to react to a bite, run to the right rod and set the hook.
Self-hooking hooks for fishing, just in such cases, will be very useful. Their main purpose is timely and with the necessary effort to hook the fish, even without the participation of the angler in this process. These devices, during the bite, provide the necessary jerk of the snap in automatic mode. Quite often, experienced anglers, based on a self-developed design, make a spinning hook with their own hands.
Absolutely any fishing rods and bottom gear can be equipped with such devices designed for hooking fish without the participation of an angler. Most often these mechanisms, depending on its structure, equipped with ordinary snacks, feeder gear and even float fishing rods.
A self-hook designed for spinning also exists, although many anglers doubt its necessity, because spinning fishing assumes that the blank is in the hands of the angler all the time. It is rational to use the spinning hook only when trolling or if the spinning is adapted for feeder gear.

An automatic fishing rod with an autohook is useful when long fishing when the angler cannot always be near her, as well as in the case when fishing is carried out on several (sometimes 4-5) rods.
Depending on their design and manufacturer, these devices are divided into the following types:
- Improved gear. This type includes floats and hooks, which, due to certain changes in their design, allow hooking fish without the participation of a fisherman.
- Various custom designs. As a rule, a do-it-yourself fish hooker and its operation scheme is based on the same principle of operation as an ordinary mousetrap. The main driving force in them is either dense rubber or a stretched spring of the required power.
- Industrial devices. This type includes technological mechanisms that were originally designed for a particular tackle.
Anglers often improve industrial designs of self-hooking hooks to suit their requirements, increasing or, conversely, somewhat weakening their sensitivity and strength of action.
Features of various types of hooks
The most important characteristic in the action of any automatic hooker is undoubtedly the force with which it affects the prey. In accordance with the required impact force, the tension power of the springs or rubber used in the device is calculated. It is, as a rule, the more significant, the heavier the tackle for which the mechanism is intended. For example, a feeder hook requires more actuation force than a donkey hook with a short or no stick.
It is also important to take into account the power required for removing the device from the safety stop and initiating the cutting itself. Stoppers and triggers, depending on the tackle, also come in different designs and power, but, what is necessary, they all must be sensitive enough, this will ensure that the device responds to any, the most careful bite.
It should be borne in mind that an industrially made fishing hook is calculated for a certain gear, with specific requirements, only if it comes with this gear. The rest of the industrial mechanisms, which have different principles of operation and power, must be selected for your tackle on your own and, if necessary, modified.

A do-it-yourself hook always takes into account the characteristics of that rod, the tackle for which it was conceived and made. For example, a do-it-yourself spinning hook should take into account the following factors:
- Spinning weight and length.
- Approximate casting distance. This is important for an approximate calculation of the weight of the equipment in the water.
- When trolling - the strength of the current and the speed of the boat.
- The size of the expected trophies, their type, as well as how the bite of this type of fish usually occurs (carefully or quickly).
If the angler, who independently manufactures an automatic hook for his tackle, manages to take into account all these factors and make a suitable device, the number of unnoticed or empty bites will be significantly reduced.
In the manufacture of hooks designed for bottom gear, anglers often use a variety of runners in combination with rubber bands or converted mousetraps. Also common are vertical posts that are fixed in the ground or at the side of the boat, with powerful springs and appropriate stoppers.
Apart, among all the devices for automatic hooking of fish, are floats and hooks.
A float that promotes self-cutting of fish is, as a rule, an ordinary float with an elongated central rod, supplemented by a disk of non-sinking material with a hole in the center for the passage of the upper part of the float rod and a special stopper (thickening) in the upper part of this rod. When biting, the main part of the body of the float goes under water, but at the end, the stopper interacts with the disk, which sharply slows down its going under water and contributes to the self-hooking of the fish.
Self-locking hooks have a modified shape, somewhat similar to a spring, which contributes to its deep penetration into the throat of the fish and its notching. Such hooks are produced by only a few foreign enterprises and are rarely found on sale. Their main drawback is that it is very difficult to release the caught fish from such a hook.
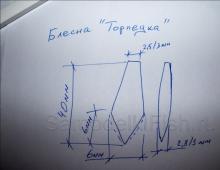
An example of a homemade self-cutting feeder
Let's take a look at one of the options for an automatic hook for a feeder, in which the rod is attached to the swinging element of the rack, like a rocker arm, and hooking occurs due to spring compression. Such a mechanism is quite possible to do it yourself. Its design and principle of operation is easy to understand by understanding the following diagram:

The numbers on the diagram indicate:
- Rod (spinning).
- The front bracket of the rocker on which the fishing rod is attached.
- Rocker body.
- Fixing the axis of the rocker arm to the stand around which it rotates.
- Rear rocker bracket. The upper part of the spring is attached to it.
- Spring.
- The main stand of the undercut. It must be made of stainless steel corner.
- Holes on the main rack. They are needed to strengthen or weaken the tensile force of the spring.
- Cushioning rubber. It is necessary to soften the action of the spring.
- Attaching rubber to the body of the bracket.
- Bracket axis.
- Trigger. It is made of steel and must have a certain bend in the upper part so that it can slip off the axis of the bracket when cutting (it must be selected empirically).
- Fastening the axis of the bracket to the body of the rocker arm.
- Main line with rigging.
- Coil.
The adjustment of the mechanism is carried out after fixing the main rack in the ground. The sensitivity of the trigger depends on the top curve of the trigger.
Useful video
In the video below, we will see an example of a self-tapping feeder in action:
Any self-hooking devices, industrial or self-made, are designed to help the angler when fishing and not allow prey to leave when biting. But still, they should be used only under certain circumstances, when they cannot be dispensed with. After all, the joy of catching a trophy that was cut on your own is incomparably higher. Yes, and the fishing in which such devices are used cannot be called sports, rather, semi-automatic.
Simple hook for bottom gear


Greetings to all homemade anglers. Today we will make a simple samopodsekatel for donkey. The main advantage of this design is ease of manufacture, it can be made from available materials with a minimum set of tools. The disadvantages include the dimensions and the need to level the site on the shore of the reservoir for its installation. This design has already been tested and proven to work. It may seem to someone that the spring turned out to be too powerful and the lever works very sharply, but this is not so. In real fishing conditions, when the tackle is thrown into the water, the hook looks completely different than in the workshop. It even seems that the power should be increased.
1. Vise.
2. Hammer.
3. Pliers.
4. Screwdriver.
5. Hacksaw for metal.
6. Hacksaw for wood (if necessary).
7. Drill and drill bits (optional).
8. Roulette.
1. Board.
2. Steel spring wire with a diameter of 4-5 mm.
3. Bicycle spoke.
4. Galvanized metal 0.7mm thick.
5. Nail.
6. Eraser.
7. Self-tapping screws.
We take a board 40 by 12 cm as the basis for the undercut. 1 cm thick. I will make a reservation right away, all dimensions are very arbitrary and can change.

The most time-consuming part of the work is bending the spring wire line catcher. We mark from the edge of the wire 5 cm.

Clamp in a vise and bend under 90 degrees.

We trim the resulting bend with a hammer. The main thing is to do everything slowly so that the wire does not burst at the bend.

Now we mark 8 cm from the bend, we also clamp it in a vise and bend it in the opposite direction.

The most important part of the work, bend the wire 180 degrees. We mark 5 cm. We clamp it in a vice and first bend it at 90 degrees.

Now, using a screwdriver and a hammer, carefully bend the wire 180 degrees.


If everything worked out, mark the center of the line catcher and bend it a little.


We apply the resulting workpiece to the base and mark the beginning of the bending of the spring.

We clamp with a vice and bend under 90 degrees. in the direction of the forest catcher.

We mark the size approximately equal to half the width of the board and bend it to 45 degrees. to the plane of the undercut lever.

We mark 5 cm and cut off the excess with a hacksaw.

The lever with the spring is ready, now we will make the gatehouse from a bicycle spoke.

We mark from the edge of the knitting needle 5 times 2 cm.

We bend with pliers, forming a part, as shown in the photo.


On the other edge of the knitting needle, we bend the hook for attaching the eraser.


Now you need to fix the resulting parts to the base. To do this, we will make four clamps made of galvanized metal with a thickness of 0.7 mm.

We mark four segments of about 4 by 1.5 cm and cut them off with a hacksaw.

We bend the segments in the center, using the remaining piece of wire as a template. Also, if there is anything, you can round the edges.


Of course, it is better to drill holes in the clamps for self-tapping screws, but if there is nothing, then you can pierce with a nail or dowel.


We fasten all the details to the base with self-tapping screws. It is better to put one clamp on the screws and make it removable, although this is not necessary.


We bend the undercut lever, mark the location of the gatehouse and fasten it.


In order for the edge of the spring not to push through the board, we install another metal plate. On the top of the gatehouse we install an eraser with a slot for fixing a fishing line or cord.


The self-hooking device is almost ready, it remains to install one more detail, without which it will not work. Here is a hook.

It can be bent from a nail and driven into the base. We found a ready-made one and will screw it into the base in the center of the line catcher.


Our cutter is ready to go.
A little advice. To avoid accidental triggering of the hook when alert, it can be fixed, for example, with a nail.

This design of the undercut is designed for bottom tackle such as a throw or an elastic band.

The principle of operation is this. We throw the tackle into the water, alert and fix the hook, thread the fishing line into the hook.

We fix in the slot of the eraser.

We remove the latch and wait for the bite.


At the moment of bite, the gatehouse disengages and the spring is activated. Fish on the hook!
One collar was made removable so that the undercut lever could be folded and it was convenient to transport it. We unscrew the clamp, move the lever to the edge of the base and put the clamp in place.


Knots in more detail.


All no tail or scales!
Watch a video on the manufacture of a mono samopodsekatel here.
Donkey self-hooking
Fishing is a great form of recreation, but it takes a lot of time to be on the shore and hold a fishing rod in your hands. Fishermen often go out to eat, chat with friends or just relax. And at such moments fishing stops. In order to be able to sometimes move away and not observe the bite, automatic hooks were invented. One of them is a donkey self-hook.
Why do you need an automatic fishing hook?
If several bottom gear are used when fishing, or the fisherman is simply distracted, you can miss the moment of a good bite. This is where donkey self-cutters come in handy. They will be able to hook the fish in time without the participation of the fisherman - to the structure will make an automatic jerk. Specialists in fishing are able to make a hook for a bottom fishing rod with their own hands.
Types of automatic undercutters
Similar devices can be installed on any rod. Most often they are installed on simple hooks, feeders or fishing rods with floats. A spinning hook becomes appropriate if a feeder tackle is installed on the rod.

Autopodsekatel can be installed:
- On the rod or next to it. With this option, the fishing line will be stretched with a rubber cord. If not, a simple stationery gum will do. You will also need steel wire (or a simple paperclip) to make the lever. A fishing line will be attached to one side of it, and a stretched rubber cord will be attached to the other. The lever will be in the first ring of the rod. If the line pull is horizontal, the lever will pop out of the ring. Then the elastic will shrink, and the fishing line will follow it.
- On a leash. The cutting takes place right in the water. The hooking mechanism will be created on the basis of rubber or spring. At the moment of bite, one of the stretched ends of the lever will be released. After the lever is straightened, it will make a sharp jerk, and the fish will be out of the water.
Both options allow you to increase the fish catch several times. The main thing is that the mechanism for their work is installed correctly.
Fishermen are constantly improving designs, making them as comfortable as possible for their rods. Some make them with their own hands from improvised means, others buy ready-made hooks to finalize the mechanism.

There are several types of automatic undercutters:
- Improved tackle. Some changes are made to the design of the hook and float, thanks to which the cutting will be automatic.
- Homemade design. A do-it-yourself autohooker is similar to a mousetrap in terms of the principle of operation: its movement is based on either rubber or a spring.
- Industrial undercuts. These designs are made for certain gear.
Anglers can buy an industrial kit and modify it as they wish.
Do-it-yourself do-it-yourself donkey hook
To assemble the mechanism you will need:
- Fishing rod;
- Mount that will hold the fishing rod (consists of two parts - the front bracket, and the main part);
- The fixing part (connects the bracket and the main part, is responsible for lifting the fishing rod);
- Back brace;
- Spring of a certain power;
- Shock-absorbing rubber;
- Holes on the main part of the mount;
- Staple axis;
- Rubber that is attached to the body of the bracket;
- Trigger made of steel (with a bend at the top so that the bracket can slide off when hooking);
- Fastening the bracket to the main part;
- Fishing line;
- Coil;
- Tackle.

The whole structure is fixed in the ground. The sensitivity will depend on the trigger.
materials
List of tools and materials for the manufacture of a self-hooking on the donk:
- Aluminum plate;
- Wire with a diameter of 2 mm;
- hardened plate;
- Wooden plank;
- Pliers;
- Screwdriver;
- wire cutters;
- Rubber or spring;
- Plastic (computer disks will do);
- aluminum rod;
- Pin;
- Bolts and nuts.
Naturally, you need to prepare the rest of the necessary attributes of fishing:
Manufacturing
- Bend the aluminum plate in the shape of the letter U with sides of 2 cm.
- Drill 2 holes up to 2 mm in diameter on each bent side.
- Wind approximately three turns of wire onto a hardened plate. It will act as a spring.
- Bend the end of the wire so that it forms a large hook.
- Install the wire in the aluminum plate, put on the spring. Put on a cambric on the opposite end. He will be the fixer. Bend the end of the wire.
- Now you need to wrap the long end of the spring with a loop around the wire.
- Fix the mechanism at the very end of the plank along with the wire ring.
- Substitute the folding structure so that it touches the gatehouse.
- Using several self-tapping screws, attach the plate to a wooden board. The structure is ready.
- When installing an automatic undercut, you need to be careful and cautious. The cutting force, the tension of the rubber or spring is always large. If the slider jumps off the base, there is a risk of injury.
- If the water is calm or the current is minimal, it is recommended to set the trigger pull to minimum. This will increase the sensitivity.
- To attract more fish to the bait, you can install an elastic band with a feeder.

Other solutions to the problem
There are also options invented by simple fishermen. One of them is an automatic float cutter. It's going like this:
- The upper antenna is pulled out of the float.
- You need to put a ring of foam rubber on it. The size of the ring is slightly larger than the antenna.
- Now you need to return the antenna to its place. Attach a bead on top.
- In the process of biting, the ring will not allow the float to go to the bottom, and the fish will be hooked.
The automatic hook is indispensable if the fishing is long and you want to relax, but at the same time not to lose the catch.
Undercutters for bottom rod and feeder

Many anglers are fond of several types of fishing. To combine sea fishing with spinning for a predator from the shore and calm sitting hunting for white fish with bottom or float gear, you need to be a rare lucky person or a professional. When you are on the sidelines, trying to lure predatory fish, keep track of the bite on the triggered bottom gear, react in time, then it is almost impossible to run to the place where the fishing rods are set. There is still a way out of this situation - this is automatic hooking when biting without the participation of the angler. Do-it-yourself hook for a bottom fishing rod can be made and installed right on the shore of a reservoir.
Types of devices for auto hooking
The practice of using rod-mounted autohook devices has been around for decades. The design of the samopodsekatel is offered:
industrial production. Such options have a complex structure, often large dimensions, high price;
homemade production. Represented by a large number of options for which inexpensive improvised materials are used. In the public domain there are drawings and the order of assembly of such devices.
Industrial production hooks replace the stand, they are used to install a rod in them. They require personal care, are subject to corrosion, have complex technical solutions for the execution of undercuts. The moving parts of the auto hooking mechanism are clogged with dirt, sand, the springs are deformed, which causes missed bites and idle hooks.
Self-made self-cutters, unlike purchased ones, have a budget cost. Misfires during their use are practically excluded. The simplicity of the design allows the use of such structures in any natural conditions, does not require additional maintenance and care.
Simple and cost effective design
A homemade feeder hook is easy to make from two rubber bands and a paper clip. Such a device, after casting the donkey, fixes the main fishing line, and during the bite at the right time, cuts the fish.
The procedure for the use and manufacture of a homemade undercut for the feeder:
the elastic bands are connected into one by threading into each other and fixed at one end by the coil leg;
the paper clip is straightened into a flat wire, with the help of pliers, hook-shaped bends are formed along its edges;
after casting the bait into the water, the modernized wire hook is fixed with one hook on the first ring of the rod;
with the help of the main line, the self-hook is cocked, the free wire hook of the self-hook is fixed.
float based
People's ingenuity and ingenuity showed itself in fishing with float gear. It happens when the bite is activated, and it is physically impossible to catch two or three rods. A bite occurs, but the angler does not have time to cut. For such situations, a self-hooking device based on a float was invented. The manufacturing principle is simple:
- a flat foam cylinder is cut out, the size of which is determined empirically by the diameter of the float;
- the selected piece of foam rubber is put on the tip with free movement along it and is fixed with a bead with cambric.
When biting, the modified design goes under water. In this case, the cylinder creates a significant resistance to immersion, and self-cutting occurs.
Analogue of industrial production
As a rule, purchased holders with automatic hooking have a high price and are not always made of durable material. Therefore, having the necessary set of tools and a sufficient budget amount of funds, you can make such a device yourself.
List of tools required for manufacturing:
- pliers;
- grinder with cutting wheels;
- welding machine, electrodes;
- drill;
- hammer;
- yew;
- marker or chalk;
- paint brush.
- fittings, with a diameter of 8 -10 mm for the manufacture of legs;
- sheet iron 2 mm and 5 mm thick;
- door spring 50 - 80 cm long.
The procedure for manufacturing a self-hook with a rod holder:
- according to the drawing, reinforcement for the manufacture of legs is measured, cut off with a grinder;
- prepared rods are formed with a hammer and yews;
- from sheet metal (thickness 2 mm), brackets are cut out that hold the rod, spring and hooking mechanism;
- holes are drilled in the spring retaining bracket;
- the hook tongue is made of iron 5 mm thick;
- cut and prepared parts are welded in the right order;
- the structure is painted.
Conclusion
The use of automatic hooks is reasonable and confirmed by the amount of fish in the catch. With their help, it is possible to combine fishing and recreation, as well as different types of fishing. The saying “You chase two hares, you won’t catch one” with such assistants is refuted.
Manufacturers of tackle for fishing regularly replenish the range of new devices that simplify the process of fishing. The feeder self-hooking device is one of such accessories, with the help of which the amount of catch is increased significantly. With feeder fishing, such tackle is especially important, because it allows you to quickly respond to bites without the participation of a fisherman.
Auto hooking is often used when catching fish with more than one rod, which is far from uncommon for feeder fishing. It is also advisable to get a self-hooking hook if bites are rare or you have to fish at night. In fishing, you need to take into account the breed and physiological characteristics of the fish you want to fish. This determines the strength and speed required for hooking. The purpose of samopodsekatel is as follows:
- in a timely manner and with the necessary force to perform hooking without the participation of the fisherman;
- provide snap snap in automatic mode;
- perform hooking if the fisherman fell asleep during night fishing.
Devices for automatic hooking quickly respond even to a weak bite during feeder fishing and provide the necessary line tension. This increases the chances of returning home with a rich catch, allows you to do some other business in parallel with fishing, and also makes it possible to catch fish without having to be present in person.
Technically, the self-hook looks like this:
- support post - necessary for installing the device on the shore;
- rocker - for fixing the handle of the fishing rod;
- spring - creates a jerk of the feeder up (cutting) when the fish swallows the hook;
- trigger mechanism (trigger) - helps to trigger the rocker when the fishing line is pulled by fish.
The design features of the samopodsekatel, with the right attitude, excludes "empty" undercuts. For each type of fishing they are individual. Some have rod mounts. For feeder gear, this is a prerequisite. Also important is the elasticity of the spring, structural features and trigger force, depending on the type of gear and the weight of the intended prey.
Types of samopodsekatel for different types of gear
Devices for automatic hooking are equipped with any used gear, including donks. Most often, these devices are installed on float fishing rods, ordinary snacks and feeders.
Structurally, the devices are divided into:
- modernized - floats and hooks, which, due to small modifications to their design, allow hooking without an angler;
- homemade - a device made with one's own hand, and working on the principle of a mousetrap;
- factory - technological mechanisms designed for a certain type of tackle.
Depending on the chosen gear, the undercutters are:
- for donkeys - they help to produce auto hooks when fishing with a standard bottom rod;
- for the feeder - a wide variety of devices designed for installation on gear. Special hooks can also be used, the design features of which allow, when swallowed and pulled by fish, to easily enter the sting into the fish's mouth and stay there when playing;
- for a fishing rod with a float - devices similar to feeder or special floats are used that have a movable washer on their antenna.
With active biting, auto hooking is not needed, because. most of the fisherman's time will be spent recharging the device, thereby distracting him from the bite.
Undercuts are also divided according to installation methods. In total there are three options for fixing the device.
- On the shore next to the rod. Basically, this is a homemade type device with a special wooden stand. It is located along the line.
- On the letterhead of the feeder. Tackle in place behind the reel is folded at 90 degrees immediately after casting the bait. The feeder handle is fixed in the holder, the long part looks at the water. At the moment of a bite, the fishing line sets the trigger in motion, the spring is activated, and the self-hooking device jerks the rod up, performing hooking. This fishing option is acceptable using a very light fishing rod, the length of which is not more than 2 meters. Of the minuses of such a mechanism, one can note the possibility of corrosion, due to the fact that it is made of steel. The second drawback is the stretching of the spring over time, requiring its replacement.
- On a fishing rod stand. The handle of the tackle is located and fixed on a special bracket, which, from the moment of a bite, raises the rod up. This happens at the moment of tension of the fishing line, hooked on the hook of the hook.
The choice of setting the self-hooking hook depends on the personal preferences of the fisherman and the type of tackle used for fishing.
Features and rules for using a self-cutting device
Considering that only industrial mechanisms are adjusted for a certain type of gear, it is necessary to select and adjust a self-tipping device of a different type by trial and error. Before using the device in operation, it is necessary to take into account some nuances:
- weight and length of the rod;
- the approximate distance at which the bait is planned to be thrown;
- the strength of the current and the speed of the boat;
- features of the fish, its size, weight, type of bite.
Compliance with these rules will significantly reduce the number of empty bites and increase the catch.
Auto hooks easily cope with any fish, regardless of whether it is small or large predator. From the angler, you only need to adjust the device for a specific breed and wait for the catch. Watch the tension force of the samopodsekatel. Too strong will not allow the fish to remove it from the stopper or the hook will simply tear her mouth and she will leave. A weak tension will not have the desired effect on the fish.

The principle of operation of the automatic landing net for the feeder is very simple:
- a fishing rod with bait is thrown to the desired distance in a certain place;
- the balancer is installed in relation to the rack perpendicularly and is captured by the trigger;
- the fishing rod is inserted into the clamps on the balancer, the weakened fishing line is wound back;
- the fishing line is wound up by the trigger of the mechanism;
- during the bite, the fishing line pulls on the lever, releasing the balancer. The latter, as a result of the tension force of the spring, is pulled up, producing a cutting.
There is nothing complicated in using a self-hooking hook, and even a novice fisherman can easily understand the principle of its operation.
Making a do-it-yourself feeder samopodsekatel
On sale you can find many factory fixtures. There are also various schemes of automatic hooks for making a do-it-yourself feeder hook. They are simple and clear, so making them yourself is not difficult.
For a simple and cheap design, you will need the following materials and tools:
- stationery gum 2 pcs;
- paper clip 1 pc;
- pliers.
Stages of manufacturing a self-hook for a feeder from a paper clip.
- Elastic bands are threaded into each other, connecting together.
- One end of the elastic is attached to the leg of the coil.
- The metal clip is straightened into a straight wire.
- Hooks are formed along the edges of the resulting wire.
- After casting the bait, the device is fixed at one end to the first ring of the tackle.
- With the help of a fishing line, the self-hook is cocked, the free end with the hook is fixed.
- After setting up, it is necessary to check the operation of the device once, then cock it back to its working position.
A more advanced type of automatic hooker is similar to the principle of a mousetrap. For its manufacture you will need:
- grinder and drill with nozzles;
- metal rods with a diameter of 3 mm and 1.2 mm;
- duralumin corner 25 * 25 mm;
- door spring;
- bolts and nuts.

Stages of making a homemade undercut.
- A stand is made from a duralumin or aluminum corner to fix the device on the shore. Length about 7-10 cm.
- A balancer is made from a 3 mm steel bar with two brackets, the back of which is made in the form of the letter “D”, the front in the form of a “C”. Both brackets must be perpendicular to the axis of the balancer and opposite each other.
- In the middle of the balancer, a loop is made for attaching it to the rack. When bending the front bracket, a loop is made for attaching the mechanism trigger.
- The trigger with loop, ring and hook is made of 1.2 mm steel bar. The moving part of the mechanism is made from it. It consists of two interconnected straight cuts. The first is connected to the front bracket along with the trigger, the second is slightly bent and passed into the ring in the middle of the trigger.
- Moving elements are fixed 6-7 cm below the top of the rack when it is in the working position. A small wire hook is installed on the back.
- Using a 6 mm bolt and the same nut, the trigger is attached to the loop of the front bracket.
- In the rack, at a distance of about 25-30 cm from the top, up to 5 holes are drilled.
- The balancer is attached to the post with a loop using an 8 mm bolt and a corresponding nut.
- The spring is fixed by the hook of the handle for the holes on the rack and for the rear bracket.
After assembling the device, the process of installing the device begins.
- The balancer is bent, forming a right angle between its base and the upper side of the rack.
- The connection of the moving sections of the trigger mechanism is attached to the hook on the rear side of the rack.
- The free end of one moving part is passed into the trigger ring in the middle.
- The fishing rod is fixed in the clamps of the balancer, the excess line is unwound.
- The line is pulled back and hooked on the trigger hook.
- Pulling up, the fishing line raises the trigger hook, the end of one movable part pops out of the trigger hole, releasing the rocker with the spring. The last jerk rises up, performing cutting.
Done right, you will have a great fishing device. With a self-hooking feeder, you can not be afraid that the work of fishing will be left without remuneration.