Make a fishing rod without rings. Lightweight rig for fly fishing in a variety of conditions
Many experienced fishermen use a variety of tricks to increase their catch. It is much more difficult for beginners to achieve high results, so they have to work hard. The float rod has been around since ancient times and is effectively used for catching many types of fish. Such fishing rods show good results when live bait is used as bait.
Buy or make a fishing rod?
 A big catch is influenced by the correct fishing rod equipment, fishing tactics and much more. Therefore, you should take into account the most insignificant nuances that will help in hunting fish. A sufficient number of fishing rods have been produced for anglers, and everyone can choose according to their preferences.
Beginners are faced with a dilemma: buy a rod in a store fully equipped or assemble it yourself. Both options have their advantages and disadvantages.
If the choice fell on assembling a fishing rod with your own hands, then you will have to purchase all the necessary parts and have a minimum of knowledge on how to equip a float fishing rod for summer fishing. So, for assembly you will need:
- fishing rod;
- float;
- fishing line;
- hook;
- crusher.
At first glance, it may seem that putting the elements together is a daunting task and the work will take quite a lot of time.
But when you buy a rod fully assembled, you can forget about tedious self-assembly and you won’t have to deal with the device and think about where and what to attach. A purchased fishing rod significantly saves precious time, and if a fisherman decides to immediately go hunting for underwater predators, then this option is ideal for a beginner.
But by assembling the fishing rod with your own hands, you can adjust the fishing gear to your individual preferences. This option is suitable for more experienced fishermen who want to master the fishing craft to perfection. For this reason, professionals are constantly improving their fishing rod, therefore, every angler should know how to assemble a float rod.
Types of gear
Despite the large assortment of fishing rods that are intended for catching a certain category of fish, it is better to rely on a universal type. They can catch any type of fish, and if you use the right tactics, your fishing will be more successful. It should be taken into account that fishing rods have very different lengths, and if a fisherman prefers long casts, then he should purchase a long fishing rod with a reel, which is easier for long-distance casting of the float.
Despite the huge selection of fishing rods, there are only 3 types:
- Match. The rod is similar to a spinning rod because it has a sliding float design. With this tool you can make long casts into deep places.
- Plug-in. Due to the special design, it is easy to carry out targeted delivery of gear to a specific place in a pond or river.
- Fly feathers. The tool is not equipped with a reel, and casting is performed using swings.
How to choose a float fly rod
Professional and novice fishermen prefer this particular rod option, since it is intended for a wide variety of fishing. What you need to know about the fly rod:

Not all float rods include a reel, so you should pay attention to this important point when choosing. There are models that do not even have special mounts for the reel.
The length of the fly rod ranges from 400 to 600 cm.
How to rig a fly rod
In general, the equipment of a fly fishing rod includes a number of parts that are attached to each other and form a single mechanism. How to assemble float tackle, diagram:
- to install a float on the fishing line, you should purchase 2 cambrics;
- Lead crushers are purchased to load the float; these elements come with both a hole and a notch;
- sinkers are attached to the fishing line with an interval of 7 cm between each other, so their number should be more than two; The under-shepherd is the last weight that surrounds the entire tackle.
- so that the fish is not afraid of the fishing line and can calmly swim up to the bait, you should buy a leash.
The leash has one more advantage: often the hook clings to a snag, and in this case you can only lose it, but the entire tackle will remain unharmed.
How to choose a float
 To improve your catching results when using a fly rod, it is best to choose a float with a thin top. It would be ideal if the center of the float smoothly moves upward to a narrowing point. Goose feathers also work well as a substitute for a float. They are especially sensitive and react to any vibration of the bait.
To cope with the rigging task, you should know the type of mounting for each type of fishing rod, especially if the model does not have rings. How to attach a float with a ring to a fishing line:
- you need to insert the line into the float from bottom to top;
- then a cambric is attached to the fishing line;
- The bottom of the float is installed in the cambric.
Installing a float without a ring:
- instead of a ring, you can use one cambric;
- To make the float more comfortable, special elastic bands should be used, but they should not compress the fishing line too much.
Loading the float: some subtleties
 For successful fishing, it is recommended to adhere to some rules for loading the float. As a rule, only the top (antenna) should be visible from the water. It is to this extent that the weights are set, thereby regulating the level of immersion.
Windy weather can cause big problems for sensitive gear. In this case, the float should be adjusted so that the wind does not interfere with fishing.
The load of the float depends on the reservoir, since the current in it can be either calm or strong. The sinkers are hooked to the level until the marks on the antenna are level with the water, sometimes even lower. But no matter how loaded the float is, the predator’s attack will make itself felt.
Before going fishing, you should load the float in advance. This is done at home. It is enough to find a large container (barrel) and throw the tackle there. If it is skewed, it means that there are very few attached weights and you need to pick up more, but you must understand that a huge number of them can scare away the fish. For this reason, sinkers of different diameters are attached, for example, one large and two small.
Fixing the leash on the fishing line
 For beginners this is a real problem. The leash can be attached using a variety of methods, but it is better to use the one that is considered the most famous and effective.
You can find out other options for fastening a leash from professional fishermen, if you have such friends among your friends, and if not, then just go to the fishing forum and ask for the necessary information.
But the most current method involves tying the fishing line and leash using insulation. This element is put on a fishing line. Next, loops are made on the fishing line in such a way that the cambrics are inside the loops. Which fishing line to choose for a float rod? Here you need to focus on the mass of the fish. There are camouflage lines in blue and green. It is advisable to buy a stronger reel, since you may catch a heavy fish that will break the entire tackle.
There is a wide variety of hooks for a specific type of fish. Therefore, the fisherman can choose the most preferable option. They can be of different sizes and shapes. Again, it all depends on what size and what kind of fish the angler is going to catch. Let's say a large hook is not suitable for catching small fish, since it is not strong enough to swallow it.
Unlike Russian models, foreign ones are in great demand; they are of better quality and more efficient. Many anglers leave only good reviews about them.
To catch aggressive fish of medium or large size, you need to select the appropriate size hooks. For fishing in river conditions with a quiet current, the choice is given to small hooks.
Attaching the hook to the fishing line
 The technology involves several options for tying hooks to fishing line. Among all the methods, you only need one effective and simple one, which is suitable for beginners.
The hook must be tied to the fishing line using a special fixing knot. To perform this action, it is necessary to pass the fishing line through the carabiner so that several turns can be made. After this, the edge of the fishing line is inserted into the carabiner, and then the entire knot is tightened, thus securing the hook.
Over the years, many fishing methods have been invented. Among all the methods, you can choose the most convenient and effective one, however, with good ingenuity, it will not be superfluous to develop your own personal tactics, which will always be successful. As previously mentioned, it is better to go fishing with experienced fishermen who will tell you and show you how to fish correctly.
Attention, TODAY only!
Summer fishing for peaceful fish has won many hearts. Fishing with a float rig is considered a classic; fishing of this type is carried out using two types of rods: Bolognese and fly rods. The first option has guide rings along the entire length of the blank and can be used as a tool for catching large fish. The second one does not have any, and the advantage lies in lightness and mobility.
The rod consists of a blank divided into segments. The smaller the number of sections, the lighter the weight of the fishing gear. The main quality criterion, which also affects the weight, is the material. The best models are made from carbon fiber, a durable and ultra-light raw material; many manufacturers use fiberglass and composite (a hybrid obtained by using several elements). One of the most famous is the Mikado company. The next parameter is length. First of all, the growth of the fishing rod depends on the fishing location: if the edge is close to the shore, you need to start fishing here, since underwater inhabitants prefer to stick to such bottom irregularities. An excellent solution would be a plug-in model, in which one or two elbows can be removed if necessary. As a rule, they are produced up to 11 m long.
Advantages of fly fishing:
- minimum weight of the rod that even a child can handle;
- instant replacement of equipment if ready-made installations are available;
- quick research of both coastal and distant fishing zones;
- accurate and silent casting to the baited area;
- functionality and wide range of applications;
- constant contact between the angler and the rod.

Fishing with a fly rod does not involve the use of reels. The fishing line is attached to a special device - a rod connector. It is structurally reminiscent of a small bushing, which is glued into the whip (if a shock absorber is not used) and has a hook for the loop. Ready-made leashes with various options for loading and equipment are convenient to store and transport in leash holders; some fishermen use small reels. In the event of a break, the installation can be re-equipped in a matter of minutes. The diameter of the fishing line depends on the size of the intended trophy and hook. Fishing rod floats are sliding floats, with a long guide tube for catching small fish and a high antenna for long distances and deep places. Shot weights are placed along the entire length of the leash. Proper loading increases the sensitivity of the tackle and distributes the test weight of the float among themselves.
The simplest equipment is to attach the leash directly to the connector, but when hunting for a decent trophy, you should use a rubber shock absorber. The element has different densities and stretch lengths, and is capable of dampening the jerks of large fish, such as carp and grass carp, performing the functions of a friction clutch.
Fishing in still waters is characteristically different from fishing in flowing waters. On a pond, an angler can use small weights that would be easily pulled by the current on a river. The fly rod is used in both situations; only the equipment is adjusted. The thickness of the leader when fishing with a retrieve is significantly reduced, since the fish is in direct contact with the line and feels the roughness. The installation can be equipped with an additional hook, so different depths can be fished with one wire. The float is used in a sports class, with a test weight of up to 2 g. It is attached using tubes placed on the keel and a small ring built into the body.
There is nothing easier than equipping a regular float fishing rod. Despite the fact that there is enough information about this, it still makes sense to dwell on this again and, step by step, tell you how to equip a float fishing rod.

There are two options for a float rod:
- when there is a rod with rings;
- and when there are no rings on the form.

If the rod has rings, then a reel is supposed to be installed, and the rings are a guiding element for winding or unwinding the fishing line. In this case, a fishing line is threaded through all the rings.
If the rod does not have rings, then at the tip there is a special mount for fishing line. It is attached to the tip with glue. A loop is knitted at the end of the fishing line using a figure eight knot. The loop is put on the fastening, after which the fishing line is locked with a special device.
Equipping a float rod with a float

A fishing rod without rings allows you to accommodate a piece of fishing line with a length equal to the length of the rod or 0.5 m longer than its length. With such a fishing line length, you can easily cast a fishing rod and pull it out of the water. In this case, the fish or hook will fall directly into the hand.
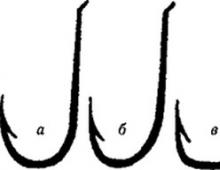
How to attach a float with a ring at the top to a fishing line.
- First you need to insert the fishing line into the ring, in an upward direction.
- A rubber cambric is put on the fishing line. Such a cambric can be purchased in a store. It is possible that it is included in the float kit, which is very rare.
- After this, the keel of the float is inserted into the rubber cambric. This can be seen in the figure.
How to attach a float without a ring to a fishing line.
There are times when you have to attach a float that does not have a fastening ring. In this case, you will have to take two cambrics of the appropriate diameter and put them on the keel and on the tip.
When selecting the size of the cambric, you need to remember that when the depth of immersion of the gear changes, the elastic band is triggered. To prevent this from happening and to prevent the elastic from breaking during fishing, it is better to avoid narrow elastic bands.
Some fishermen secure floats using stoppers. This method can be considered as an alternative option.
Proper float loading

A correctly loaded float has only its upper part, the antenna, sticking out above the water. This is achieved by attaching lead pellets to the fishing line. If most of the body peeks out of the water, then this indicates incorrect loading and fishing with such gear is quite difficult, since such a float does not have the necessary sensitivity. This approach can be justified in the case of pike fishing using live bait.

If necessary, the float can be loaded while fishing. A pellet is attached under the float, after which the tackle is thrown into the water. If the float lies or its working part is visible, then you can attach another pellet. If the float is completely submerged in water, then you can bite off a little lead from the pellet. To do this, you need to have a tool with you and not use your teeth.
The float adjusted in this way will have maximum sensitivity. Although the float is loaded for different fishing conditions. If there are waves on the surface of the water, then you can leave only a small part of the body of the float on the surface of the water, which can minimize visual deception.
How to load a float at home
In order not to suffer on the pond and not waste useful time on loading, you can load the float at home. To do this, fill a 10 liter or 15 liter bucket with water, and further actions are identical to those on a pond. As a rule, all fishermen prepare and adjust their gear before fishing. During fishing, only in extreme cases when the tackle comes off, which is something you can’t do without when fishing.
In the process of attaching the pellets, you need to ensure that the pellets are well fixed in their places, but the efforts must be such as not to damage the fishing line.

The leash is an integral part of any fishing rod. It is needed for the following:
When a snag occurs, the leash will break first, since its thickness is always less than the thickness of the main line. This is very practical, since the main part of the gear remains intact and unharmed. To restore the functionality of the fishing rod, you only need to install a new leash with a hook. Most fishermen go fishing with ready-made leashes so as not to tie hooks while fishing.
A thick line can alarm the fish, so thinner leashes provoke the fish to bite, since they are less noticeable.
Recently, with the advent of fluorocarbon, this problem has begun to fade into the background. The fact is that the fish practically does not see such a fishing line in the water, so you can take the fishing line without reducing the diameter. The main thing is that the breaking load of the leash is slightly less than the breaking load of the main fishing line. Despite the fact that fluorocarbon is somewhat more expensive than monofilament fishing line, it is preferable to use it, especially since you don’t need so much of it per season. For example, a reel with 10 m of fluorocarbon is quite enough.
How to connect a leash to a fishing line
Firstly, the connection must be practical and allow, in the event of a break, to quickly change the leash. There is no need for a rigid mount here. Therefore, several methods of such fastening can be proposed. The simplest of them is a loop-to-loop fastening. To do this, loops are formed at the end of the leash and the end of the main line using a “figure eight knot” or “surgeon’s knot.” This connection is simple and reliable.
You can suggest a method using a fastener. This has become fashionable recently and allows you to install the leash on the tackle even faster. To do this, at the end of the main line, using any knot, attach a swivel with a clasp. It is better to tie a winding ring at the end of the leash, then the connection process will not be so painful, and the connection will be reliable.
How to properly tie a hook to a fishing line
There are many ways to attach a hook to a fishing line. You can get acquainted with them on the Internet, where you can master any of the nodes in a very accessible and interesting way.
You can fish in different ways: some prefer active fishing with a spinning rod, others prefer to wait for a bite on the feeder. But for almost all avid fishermen, the first memories of this process are associated with a fly rod, which sometimes they themselves did not equip. These days, not everyone knows how to tie a fishing line to a fishing rod without rings firmly and reliably, but the secret is simple. A visit to a fishing tackle store with a good consultant will solve all problems, in addition, it is advisable to have some basic knowledge about such equipment.
To rig, you first need to choose the rod itself. This issue should be taken seriously; the productivity of the fishing process will largely depend on this.
The fly rod is a blank, without rings on the knees and a reel seat. The name comes from the word “wave”; this is exactly the action a fisherman performs in order to cast the finished equipment.
The length of the rods varies, and the casting distance of the equipment depends on it. This type is chosen for short and medium distances; long-distance casting will not be possible.
Important! You won’t be able to throw the rig far with a short blank.
Fishing rods of this type have sizes from 3 to 11 meters, their use is adjusted according to the fishing location. In a familiar body of water it will be easy for you to find your way; in an unfamiliar place you will have to try the entire arsenal of fishing rods and choose the most suitable one. Usually, every real fisherman usually has several forms of different lengths with selected equipment.
Flying rods are made:
- Made from fiberglass.
- Made from carbon fiber.
- Composite materials.
The lightest will be a carbon blank, but it must be protected from impacts. Test values are usually 5-25 g, which allows the use of the lightest floats in the equipment.
Fiberglass fishing rods will be heavier than carbon ones, but the price will be lower. Usually their test indicator is 10-30, here you can use heavier floats and thicker fishing lines.
Composite materials allowed manufacturers to combine the relatively low weight of the form and fairly powerful performance when retrieving the catch. It can be equipped with both a sensitive goose feather and heavier “bombs”.
Advice! When choosing a fly-type rod, it is better to give preference to one that has a minimum number of elbows.
What is a connector?
We decided on the rod, took the floats, and got the fishing line too. You can start equipping. How to secure the fishing line on such a form? Especially for such fishing rods, special devices have recently begun to be produced, with which you can tie a fishing line of the required length. It's called a connector; it is attached to the very top of the whip using waterproof glue.

Photo 1. External type connectors.
The fishing connector is:
- external, it is selected according to the external diameter of the tip;
- internal, it is only suitable for hollow whips.
Both species have approximately identical structure. The attachment to the tip consists of two parts, one of which has a loop-shaped end, the second serves as a lock for it. Connectors are made of plastic or metal.
The metal one will be more reliable; when outputting even large specimens, it will hold securely on the tip and will not break, but it will also add weight to the form. If you use stands, then these are trifles, but holding such a rod in your hands all the time, even a carbon one, will be a bit difficult.
Plastic connectors are the most common. They are light, quite durable, and their cost is not high. But the service life is much shorter than that of metal products.
How to choose?
Manufacturers usually equip expensive branded fishing rods with such an attachment right away. Simpler forms come with either a rope on a whip or a metal ring. There are models without such conveniences; it is best to immediately select a connector for them. A salesperson in the fishing department, even with little experience, can easily cope with this task.
- When purchasing a product, whether made of metal or plastic, be sure to pay attention to its appearance. The connector lock should not move easily; a slight force must be applied to move it.
- The nozzle must be smooth, without burrs or defects, otherwise the line on it will fray very quickly.
- If possible, test the strength of the purchased product; it should not break under light pressure.
Advice ! When choosing a connector, it is better to give preference to more expensive models.
The external and internal nozzles have a wide range of seat sizes; of course, you can select them “by eye,” but it’s better not to. Ideally, it is better to take the whip itself with you and select the connector exactly to size.
Advice! The bait should fit tightly on or into the rod tip.
We secure the fishing line
For complete preparation, it is necessary to secure the fishing line, because without it fishing is impossible.
- At one end of the fishing line we make a loop and tighten it, but not to the point of a knot. At the second end we knit a leash, a hook, and don’t forget about the float and sinkers.
- Open the connector lock and insert the loop into the hook.
- We tighten the loop and secure everything with a lock.
Done, you can throw the tackle.

Photo 2. Closed connector.
Other methods of attaching fishing line
In addition to the connector, the fishing line can be tied to the tip, if there is no ring on it, in other ways. Many fishermen have their own favorite method of such fastening.
- You can make a fishing line connector. To do this, use a piece of thick fishing line, which is wound tightly around the tip. At the end, a small loop is made, which is additionally secured with wire or epoxy glue.
- There is a method using a pass ring. For it we also need fishing line. A small amount of it is wound around the top of the whip, a loop of about 3 cm is made, into which a ceramic ring is inserted.

Photo 3. Attaching the ring with a silicone tube to glue.
Advice! You can simply tie a small pass-through ring on the foot to the whip with a strong nylon thread. To be on the safe side, apply quick-drying glue to the joint.

These options have stood the test of time with many experienced fishermen, but this does not mean that modern connectors will be inferior in quality.
The journey of many fishermen began with the most popular classic tackle - a float rod. And now, despite the many specialized types of sports and amateur fishing, the fly rod is the simplest and most affordable tackle.
Many fishermen want to relax in nature after the bustle of the city, sit in a chair on the shore of a pond with a fishing rod in hand, and watch the float.
Modern float rods are represented by various types of telescopic, Bolognese or plug-in gear. It is not easy to equip rods with high-tech materials and types of rod tips. Each option has its own method of tying the fishing line.
The connection between the fishing line and the blank must perform the following functions:
- ensure the sensitivity of the gear. Any action of the bait or fish must be clearly transmitted from the fishing line along the form to the hand. Otherwise, you can lose the fish if you do it incorrectly and not get the pleasure of fishing.
- Possibility of quick equipment through simple manipulations.
- reliability connections.
Attaching the fishing line to the fishing rod using a connector
Most branded manufacturers have a tip without a built-in ring. It is assumed that the only and correct way to attach the fishing line will be through a special connector, which can be purchased separately at any fishing store.
The size of the connector is selected depending on the diameter (thickness) of the tip. The connector also differs in type of construction depending on whether the tip of the last bend is hollow or not. The inner one is inserted inside the tip, and the outer one is placed on top. Attach it with simple glue.
The connection is made using a loop on a fishing line, which is threaded into a special fastener. To prevent the line from slipping off, there is a special protective cap, which overlaps the hook of the connector.
When purchasing it, you need to pay attention to the quality of workmanship. The entire surface should be perfectly smooth, without any sagging or burrs that will cause the line to fray.
The cap must tightly close the hook, otherwise during fishing it will be annoying to lose all the equipment, including when biting a trophy fish. Most connectors are made of plastic. It is more fragile and can break if handled carelessly.
Metal products are more reliable, but if they come into contact with water, they can become rusty over time.
The connector is the most popular compared to other fastening methods because it is reliable and allows you to easily change equipment.
Thick fishing line loop

This is one of the simplest and long-used methods of tying fishing line.
To implement it you will need:
- a piece of thick fishing line, 3 or 4 mm in diameter. and 10 – 12 cm in length.
- nylon thread.
- glue moment.
The loop making process is as follows:
- A piece of fishing line is bent in half and is applied to the tip of the last knee of the rod with an overlap. The length of the protruding loop should be 2 - 3 cm. The remaining length of the ends of the fishing line should overlap the tip.
- Using a nylon thread, the ends of the bent fishing line are pressed to the tip with several turns.. The pitch of the turns can be large, since this is a rough winding to keep the line stationary relative to the tip.
- From the end of the tip, a neat thread wrapping of the pressed ends of the loop begins. For reliability and aesthetics, each turn is laid next to the previous turn.
- The laid coils are impregnated with glue moment.
The main line is connected to the loop on the fishing rod using the loop-to-loop method. This option has some disadvantages. During fishing, the knot is tightened. To disconnect, you have to spend a lot of time untying the loop or cutting off the main line.
In this case, the main equipment will be shortened each time. In addition, thick fishing line is subject to wear and aging over time under ultraviolet light.
How to tie a fishing line with a rope?
The essence of the connection is the presence of a rope as an intermediate material between the fishing line and the tip.
For installation you will need:
- a rope 5-8 cm long. It should be a kind of braided winding with a cavity inside.
- glue Moment.
Connection process:
- The rope is pulled over the tip of the whip. It is enough to insert the tip 2-3 cm inside the rope.
- A piece of string stretched over the end of a fishing rod soaked in superglue.
- A regular knot is tied at the free end. You can tie a double knot to make it larger. The free end is melted with fire so that the edge does not unravel and the knot does not unravel.
- A loop is knitted at the end of the main line, with the help of which a noose is made for throwing on a rope knot.
The connection method is simple and convenient. You can replace the main line very quickly. But there are several disadvantages to this option. During the fishing process, a noose made from a thick fishing line may become loose if the fishing line is not tensioned. Therefore, it is necessary to periodically check the node connection so as not to lose all the equipment.
Attaching the fishing line to the tip of the tip using cambrics
To connect, you will need two cambrics, each 1 cm long. The size of the internal diameter should be such that it can fit onto the tip of the tip with interference.
Installation process:

- 2 cambrics are put on the main line of the equipment in succession.
- A loop (knot) is knitted on the outermost cambric so that the cambric and fishing line are connected to each other.
- The cambric with a tied knot is put on the top and advanced from the edge by 20 - 30 cm.
- A couple of dozen turns of the main fishing line are made around the end of the tip.
- A second cambric is pulled onto the edge of the tip.
Despite the general reliability of this tethering method, there are several disadvantages. Over time, the fishing line can fray the cambrics, as a result of which the entire equipment can be lost when casting.
How to catch more fish?
I have been active fishing for quite some time and have found many ways to improve the bite. And here are the most effective:
- . Attracts fish in cold and warm water with the help of pheromones included in the composition and stimulates its appetite. It’s a pity that Rosprirodnadzor wants to impose a ban on its sale.
- More sensitive gear. Reviews and instructions for other types of gear can be found on the pages of my website.
- Lures using pheromones.
Loop on the second knee
The last leg of the fly rod is the thinnest. This means it is the most fragile, that is, the probability of its breakage is very high. This is confirmed by real cases in practice. Experienced fishermen use the option of tying the fishing line not to the first knee, but to the second.
If the tip breaks, the tackle remains tied to the other knee and is not lost.
For installation you will need the following materials:
- a piece of thick fishing line (8-10 cm).
- cambric.
- Super glue.
- nylon thread.
Connection installation:
- A piece of thick fishing line is folded in half and applied to the second knee. The ends of the fishing line are wrapped with nylon thread to secure the thick monofilament.
- The turns are carefully placed next to each other using a nylon thread.. Laying should be with a slight tension so as not to crush the hollow knee. The laid coils are coated and impregnated with super glue.
- At the end of the main line a loop is made.
- Line with loop threaded into the cambric.
- Next, the loop on the fishing line is threaded into the loop on the second knee, then it is thrown over the top of the first knee, after which it moves back to the loop on the second knee.
- Having pulled the main line, it must be wrapped around the first knee.
- To the end of the top a cambric is put on.
The option of connecting the fishing line to the second knee is somewhat complicated and requires more time to equip the fly rod. The presence of a cambric on the tip also has a disadvantage inherent in the connection option using two cambrics. Over time, wear occurs and the cambric at the tip is cut through by fishing line.
How to tie a fishing line to a fishing rod without guides?
Float rods can be equipped with a glued ring at the end of the tip. And the option for connecting the fishing line is clear and simple. If there is no ring, the angler has several options for attaching the fishing line. They largely depend on the fishing conditions.
If the equipment must be sensitive and invisible to the fish, then thin fishing lines are used, which can break at the slightest overload. The main break point is the nodes. Therefore, when choosing a method, it is necessary to take these parameters into account.
Additional nodes that weaken the overall tackle are available in the following options:
- connection using a loop of fishing line, a metal ring.
- connection using a nylon cord (rope).
- connection using a connector.